

User Manual
v1.0.0
Table of Contents
0.2 Compatibility and Performance
2.1.5 Improved Multi-selection View
2.1.6 Improved Component Control
2.1.6.2 New Context Menu Options
2.2.4 Lock State and Debug Mode
2.2.5.2 Auto-focus on Scene View
2.2.6 Behavior on Tab Double-click
2.2.7.1 Hovering multi-target Tabs
2.3.2 Considerations and Limitations
2.4.1 Dragging Tabs onto Fields
2.4.3 Dragging and Cloning Components
2.4.3.2 Moving between GameObjects
2.4.3.3 Cloning between GameObjects
2.4.4 Dragging Assets from the Asset Bar
2.4.5 Dragging Assets as Components
3.2 Inspection Detail on the Asset View
3.2.1 Compact Mode and Import Settings
3.2.2 Collapsing the Asset View
3.3.2 The Asset History Button
3.4.2.2 Context-specific Buttons
3.6 Prefab Assets and Asset View
3.7 Customization and Inspection Settings
3.8 The Asset View Context Menu
4.3 Limitation with Inactive GameObjects
6.1 Stuff we want to add soonish
6.2 Stuff who knows when we’ll add
0. An Introduction
0.1 CoInspector
CoInspector has been designed to (mostly!) behave and feel like the regular Inspector, so using it should be as intuitive and easy as possible. For this same reason, most if not all of your custom inspectors, extensions and editor plugins should be compatible out-of-the-box.
CoInspector also adds a great amount of features and shortcuts over the regular Inspector, so this Manual will try to introduce and explain all your cool new tools.
0.2 Compatibility and Performance
CoInspector is designed to be compatible with all your custom editors and Inspector customizations. However, it's impossible to guarantee compatibility with plugins that rely on ‘brute-force’ approaches like injection to customize the Inspector Window or specific Editors.
These plugins work by finding the Inspector Window, breaking its visual elements apart, and then inserting extra stuff between them, as bars or buttons. While this is not "incompatible" with CoInspector, this process can be incredibly taxing if not implemented cautiously, and may cause undesired behaviors, including:
- Performance overhead: As these plugins need to constantly look for, gather and modify the active Inspector Window. Thus, even if you close the Inspector, they will keep looking for it in the background, adding unnecessary overhead.
- Compromising CoInspector’s visual cohesion: By injecting extra elements in places we cannot foresee. This can range from funny visual stuff to making the Editor unusable.
- Errors: Most common when a plugin assumes it’ll find a regular Inspector Window or tries to inject elements at fixed positions without proper checks.
For the best experience, we strongly recommend disabling injection-based customizations of the Inspector to avoid potential issues.
If there is a specific feature you miss, let us know at hey@stuff-solutions.com, and we will consider incorporating it directly into CoInspector.
0.3 Shortcuts and Tips
This section provides a compact list of the most useful shortcuts and features that CoInspector introduces (because we get that reading the whole thing may not be your best plan).
If you want to learn more about any of these tips, refer to the linked sections of the manual!
0.3.1 Tabs/GameObjects
- Middle-click GameObjects in the Hierarchy to open them as a New Tab.
- You can drag and drop your Tabs as GameObjects into Inspector fields.
- Hold Ctrl/Cmd when reordering Components to clone them.
- You can Drag Components between different Tabs/GameObjects.
- Set Behaviors when you Click a Tab to automatically select its target and/or focus them on the Scene View.
- Set a Behavior when you Double-click a Tab for actions like locking, selecting, or focusing it.
- Set a Behavior when you Hover a Tab to see information about your targets.
- Components have additional Context Menu options like Move to Top, Collapse All, or Expand All But This.
- You can Right Click individual elements of a multi-selection to open them in New Tabs or remove them from the selection.
- Use the Local Hierarchy View to instantly check and access a target's parents, children, and siblings.
- Right-click the Back or Forward History buttons to see all steps and jump to them.
- Middle-click the Back or Forward History buttons to open the previous or next step in a new Tab.
- Right-click a Tab (or the Tab Bar) and choose Restore Closed Tab to recover up to 10 recently closed Tabs.
- You can Customize your Tab Bar to hide icons, buttons, or the scrollbar.
0.3.2 Assets
- By default, CoInspector ignores Folders so they don’t take over your selection when navigating the Project Window. You can disable this in the Settings Window.
- Click the Asset Bar once to Expand or Collapse the Asset View.
- Drag the Asset Bar itself to quickly drag and drop the inspected Asset(s) into fields or Components.
- You can directly drag certain Assets (like AudioClips, Animators, or Sprites) between Components to add them as new components.
- Drag the Add Component Bar to resize your Asset View and the Asset Preview size.
- Right-click the Asset History Button to switch between your last two inspected Assets or recover the last closed one.
- Click the Asset path in the Bottom Bar to ping the Asset, or right-click it to copy its path to your clipboard.
- Use the Folder Button and Edit Button in the Bottom Bar to reveal Assets in your file explorer, or open them with the default external application.
- You can hide or show the AssetBundle and Asset Tag footer.
0.3.3 General Stuff
- Use the Inspector Buttons in the Asset View and the GameObject View to send your targets to the regular Inspector.
- Hold Alt/Shift to pop them up in an exclusive window.
- Even with Sessions disabled, you can recover your last active workspace by choosing Recover Last Saved Session in the Tab Context Menu.
- CoInspector saves your last workspaces in each Scene you work on. You can change how to recover them (always, ask, or never) in Sessions Behavior.
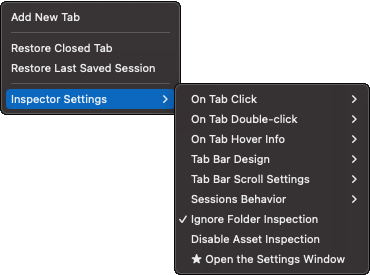
- Access a compact version of the Settings Window by right-clicking a Tab, opening the Tab Context Menu and choosing Inspector Settings.
______
These shortcuts and tips should help you grasp the essential features and workflows of CoInspector, making their experience with the tool more efficient.
1. Split Inspection
CoInspector’s main feature, and the reason it came to be, is the Split Inspection, or the ability to inspect GameObjects and Assets at the same time in different sections of the window.
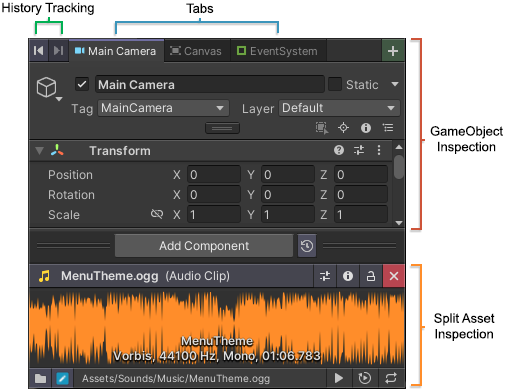
Unlike other “custom inspector” solutions that either modify the original Inspector or clone its contents, CoInspector is 100% independent of the Inspector Window. This allows CoInspector to sort and inspect targets independently of your active selection.
This way, CoInspector splits itself into 2 sections: The GameObject View and the Asset View. Each independent of the other, yet designed to work together. Assets will never override your GameObjects and GameObjects will never override your Assets.
Combined with its Tabs and History Tracking, CoInspector introduces a new set of options that allow you to work on multiple GameObjects and Assets at the same time, removing any need to juggle between multiple Inspector windows and lock states.
One window, unlimited targets.
2. The GameObject View
The GameObject section remains visually close to the regular Inspector, but introduces a great number of improvements and tools.
These new features include a Tabs system, History Tracking, Advanced Dragging, and some new Buttons and Tools covered in this section.
2.1 New Buttons and Tools
These are features that can be accessed through buttons or are integrated within CoInspector itself. Some buttons may mention Tabs, but they will be fully explained in their own section.
2.1.1 The Select Button
This button instantly selects the target of the active Tab in the Hierarchy. With multi-target Tabs, every target will be selected at once.
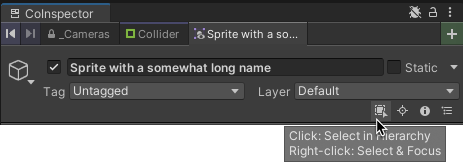
To know if the active Tab is already selected, use the following visual cues:
- A blue line will appear above the Tab.
- The Select button will show as disabled.
Modes:
- Regular click: It will select in the Hierarchy the target or targets of the active Tab.
- Right click: To select the targets and also focus them on Scene View. If you just want to focus the target, use the Focus Button.
(With both ‘Auto-selection’ and ‘Auto-focus’ enabled, you will rarely interact with this button.)
2.1.2 The Focus Button
This button is meant to help you center your workspace around your active Tab and targets without needing to double-click the Hierarchy or change your active Selection.
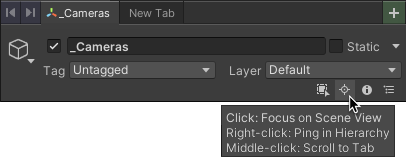
Modes:
- Regular click: To focus the target of your Tab on Scene View. In other words, it centers your view as if you had double-clicked the GameObject in the Hierarchy.
With multi-target Tabs, the view will be centered on a point between all targets. - Right click: To ping the target in the Hierarchy. For multi-target tabs, only the first element will be pinged.
- Middle click: To auto-scroll the Tab Bar to your active Tab. Useful when you have many Tabs open at the same time.

(Example of a Tab after being scrolled back into view)
2.1.3 The Inspector Button
This button is exclusively dedicated to sending the active target(s) of your Tab to the regular Inspector Window.
Modes:
- Regular click: It will send the target(s) of the Tab to the regular Inspector Window. If an Inspector Window is already available, it will use it. If not, it will create a new one.
- Alt/Shift + click: It will pop up the target(s) of the Tab in an exclusive, locked Inspector Window.
Why is this here?
- Currently, CoInspector doesn’t support multiple windows, and some users may prefer combining Tabs with multiple locked Inspectors for certain tasks.
- CoInspector draws every component as the regular Inspector, but it’s impossible to assume perfect compatibility. If something fails with a Component or a plugin, this button will help you keep working.
- Certain Editor Tools could not trigger outside the Inspector Window. This is not CoInspector’s fault, but a Unity limitation present in Property Windows.
We've implemented workarounds to manually trigger these tools and have tested extensively to find all possible cases, but some may have escaped our best efforts.
If a component, extension or custom editor fails to show or presents any bug or error, please let us know at hey@stuff-solutions.com.
2.1.4 Local Hierarchy View
This button gives you access to another new feature: the Local Hierarchy View.
This allows you to instantly check your target’s position in the Hierarchy without pinging it.
When clicked, CoInspector will pop up the target in a custom, independent Hierarchy Window, where you can easily check and access its parents, children or siblings.
Things you can do here:
- Instantly check and access the target’s parents, children and siblings.
- Set a new target for the Tab: Click any GameObject or choose the option in the Context Menu.
- Open a GameObject in a new Tab: Middle-click any GameObject or choose the option in the Context Menu.
- Select/Ping/Focus a GameObject: Right-click it to open the Context Menu and choose the desired option.
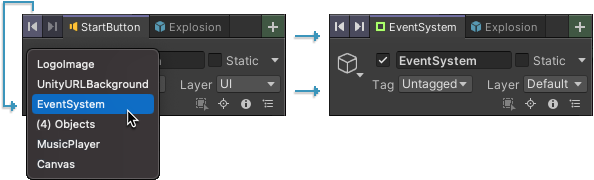
This button is disabled with multi-target Tabs, but thanks to the new Multi-selection View, you can right-click any individual GameObject of your selection to open its Local Hierarchy View.

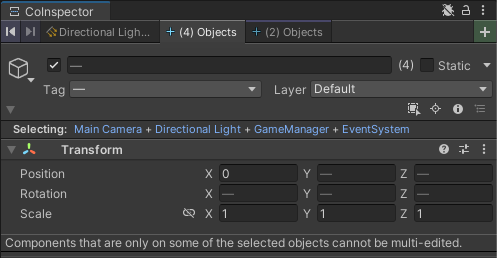
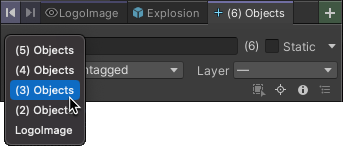
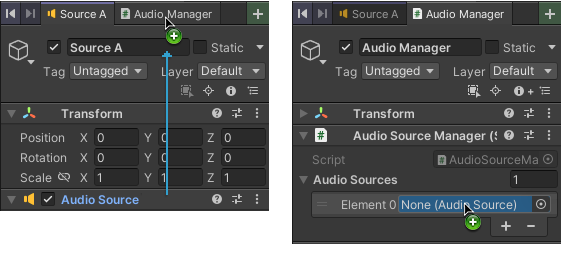
2.1.5 Improved Multi-selection View
When adding CoInspector’s multi-target support, we quickly found a limitation in our design:
“Wait, so how does the user know which GameObjects they’re targeting…?”
- An underpaid Unity dev
…And then, we remembered this already happens in the regular Inspector, so we decided to add a little tweak:
A foldable section that lists the content of every multi-selection.
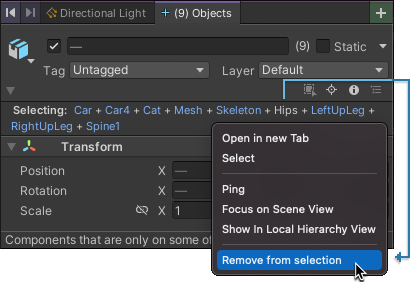
This way, you can be sure of the GameObjects you're working on.
Some extra things you can do here:
- Inspect individual elements: Just click it on the list
- Open elements in a new Tab: Just middle-click it.
- Remove elements from the selection: Just right-click and choose the option
- Ping and Focus elements: Just right-click and choose the option.
- Open elements in Local Hierarchy View: Just right-click and choose the option
Combined with Tabs and History Tracking, this should make your experience of dealing with multi-selections way more streamlined and intuitive.
2.1.6 Improved Component Control
CoInspector introduces new ways to quickly expand/collapse your Components and reorder them: These are the Component Collapse/Expand Button and some New Component Context Menu Options.
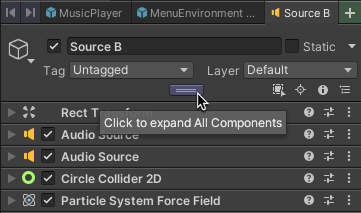
2.1.6.1 The Component Collapse/Expand Button
This button helps you quickly collapse or expand all components in the inspector window.
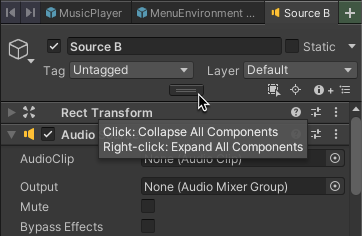
Modes:
- Regular click: To collapse all components at once.
- If all components are already collapsed, the button will turn blue, and clicking it will instead expand the components back.
- Right click: To expand all components at once.
You can show or hide this button through the Settings Window or in the Context Menu, at ‘Inspector Settings/Tab Bar Design/Show Collapse button’.
2.1.6.2 New Component Context Menu Options
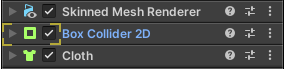
CoInspector adds individual options to your Components so you can have even more control over them:
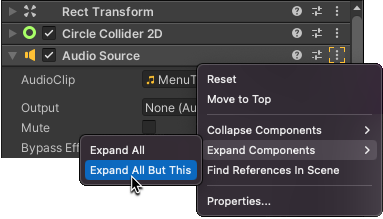
Things you can do here:
- Move to Top: To instantly send a Component to the top of the Component list.
- Collapse All: To collapse all Components at once.
- Collapse All But This: To collapse all Components, keeping the selected one expanded.
- Expand All: To expand all Components at once.
- Expand All But This: To expand all Components, keeping the selected one collapsed.
Note: When using "… All But This" options, CoInspector will scroll to the selected Component to help you identify it.
_______
These tools, combined with Advanced Dragging, provide quick and flexible ways to control and rearrange your components within the inspector window.
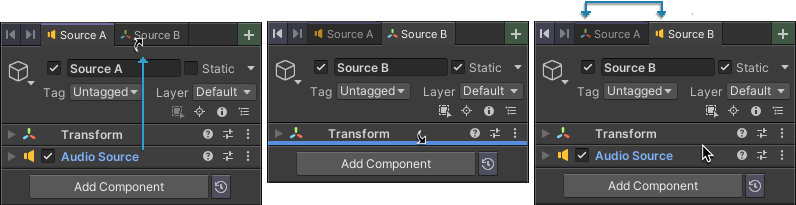
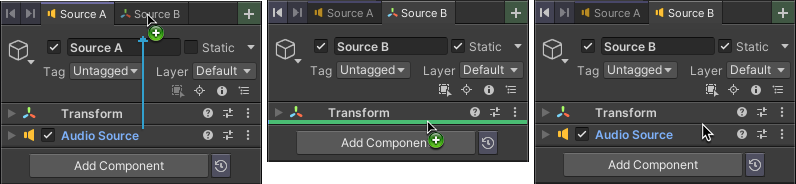
2.2 Tabs
Tabs are the second main feature of CoInspector. As tabs on a browser, you can create as many as you want, rearrange them, and switch between unlimited targets with a single click.
Each Tab works as an independent Inspector. Unless locked, the active Tab will update as the Selection changes, but ignoring null selections, empty selections and, of course, Assets.
Some of their main features include:
- They cannot be null: Empty or invalid selections will be ignored. Only choosing a new target, deleting the current one or closing the Tab will affect your active target.
- They’re 100% independent between them: So you can assign different lock states, debug modes and combine different multi selections.
- They keep track of your Inspection History: So you can freely navigate each Tab’s last selections and even recover them if accidentally closed.
2.2.1 Types of Tabs
Depending on the number of GameObjects inspected, a Tab will be a Regular Tab or a multi-target Tab. Understanding them will help you make the most of your workspace.
2.2.1.1 Regular Tabs
These are the ones that point to a single GameObject in the Hierarchy.
Visually, these Tabs will display the name of the target and an icon representing its most relevant component (or you can disable icons in the Customization Section).
2.2.1.2 Multi-target Tabs
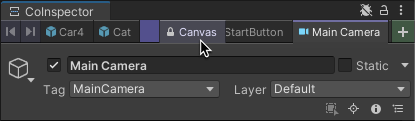
When more than a GameObject is selected, the active Tab becomes a multi-target Tab. Visually, they will display a blue ‘+’ symbol and the number of objects selected.
Each Tab works as an isolated multi-selection, so you can:
- Store different selections in different Tabs and switch between them.
- Use the Improved Multi-selection View, to check your targets, open them in new Tabs, remove them from the selection… and more.
Combined with Individual lock states and History Tracking, it is highly unlikely to lose a multi-selection, even by accident.
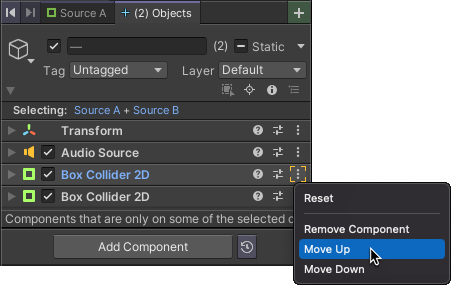
Multi-target Tabs work as Regular Tabs do, but they have some considerations to keep in mind:
- Components can’t be reordered via dragging: But you can still use the Component’s Context Menu options to move them down and up.
- Local Hierarchy View is not available: But you can right-click individual elements to individually open them in this mode.
- Focus on Scene View can be unreliable: As it will try to find a “middle point” between all targets.
- Deleting GameObjects will remove them from any Tab targeting them.
2.2.2 Creating Tabs
When creating Tabs, you can choose between completely New Tabs or already Filled Tabs.
2.2.2.1 New Tabs
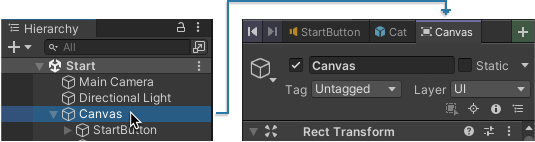
These are Tabs with no target assigned yet. To assign a target, just click on any GameObject in the Hierarchy and the Tab will update to register it, as the regular Inspector Window would.
You have the following ways to create them:
- Click the Add Button: To add a New Tab to the end of the Bar.
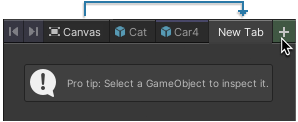
- Right/middle-click the Add Button: To add a New Tab right next to your active Tab.
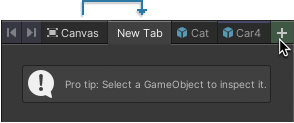
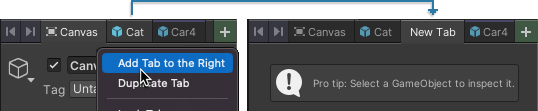
- Right-click a Tab and select “Add Tab to the Right”: The New Tab will be added right next to it.
Some considerations:
- New Tabs can’t be locked or set to Debug Mode.
- Untouched New Tabs (as in, created but never assigned a target) are ignored by History Tracking and Sessions, so they will be automatically erased after Assembly Reloads, Editor restarts and Play Mode changes.
2.2.2.2 Filled Tabs
These are Tabs created with target(s) already assigned, so you can immediately start working on them.
You have 2 options:
- Middle-click a GameObject on the Hierarchy: This will open it as a Tab next to the current one (just as if you had middle-clicked a suspicious link on your browser!).
- Right-click a GameObject and choose ‘Open Selection in a New Tab’: This will open it in a Tab at the end of the Tab Bar, without setting it active.
______
To open multiple GameObjects as a multi-target Tab, the process is as follows:
- Have an active multi selection in the Hierarchy.
- Middle-click any GameObject of the selection (or choose the ‘Open in a New Tab’ option). The Tab will be created right next to your active Tab.
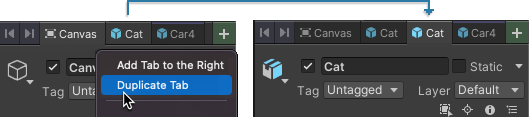
Finally, you can duplicate any existing Tab by right-clicking it and accessing the Context Menu.
2.2.3 Basic Controls
For an easy workflow, CoInspector Tabs are designed to mimic browser tabs.
Some things that you can do:
- Drag them around to rearrange them.
- Dragging Tabs has more uses, like dragging them into Inspector fields as GameObjects. This is explained in the Advanced Dragging section.
- Close them with a middle-click.
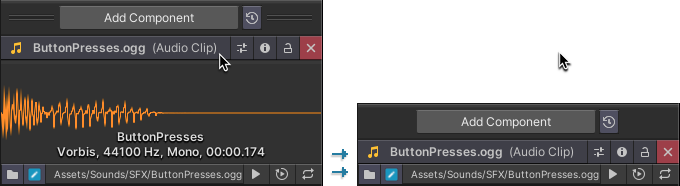
- Hover them to reveal information about their target(s).
- Click them to perform a Behavior on Tab Click
- An automatic action each time you click on a Tab
- Double-click them to perform a Behavior on Tab Double-Click
- An automatic action triggered each time you double-click a Tab
- Right-click them to reveal a Tab Context Menu with way more options.
Pretty straightforward!
2.2.3.1 Scrolling the Tab Bar
For navigating the Tab Bar once it starts to get filled, you can either use the Scrollbar that will show up, or simply scroll around using any of your mouse wheels.
The Scrollbar visibility, the scroll speeds and scroll directions of both mouse wheels can be modified in the Settings Window, and within Inspector Settings, in the Context Menu.
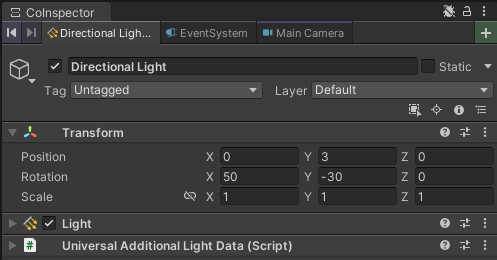
2.2.4 Lock State and Debug Mode
Each Tab has its unique Lock State and Debug Mode. Locking a Tab will keep its target(s) fixed until you unlock it again, and the Debug Mode will show or hide the debug inspector.
To change them, you have the following options:
- The upper right buttons: These will affect the active Tab, and as such, they also serve as visual indicators of the current state of the tab.
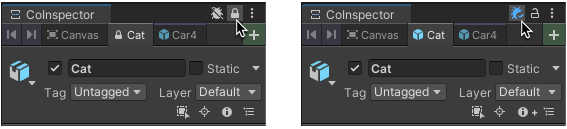
Example of a locked Tab. Example of a Tab in Debug Mode
- The Context Menu: Right-click any Tab to change its Lock/Debug modes without switching tabs.
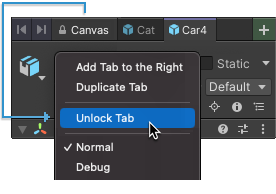
- The Locked Tab Icon: The icon that appears when a Tab is locked can be clicked to unlock the Tab. This icon will appear even if you disable icons in Tab Customizations.
- Setting your Behavior On Tab Double-Click to Lock/Unlock: This will make double-clicking Tabs immediately switch between locked and locked.
Keep in mind that Debug Modes and Lock States cannot be applied to New Tabs.
2.2.5 Behaviors on Tab Click
CoInspector provides some automatic actions when switching Tabs: Auto-selection and Auto-Focus on Scene View.
2.2.5.1 Auto-selection (Disabled by default)
When enabled, switching Tabs will also select the target(s) of it in the Hierarchy, just as if you had clicked the Select Button.
Setting Auto-selection to on or off has different use cases. We recommend reading about both and combining them based on your tasks and preferred workflow.
Auto-selection Off
- Switching Tabs won’t affect your active Selection
- Active Editor Tools will keep working after switching Tabs
- So if you’re editing an Animation or a Collider, switching to inspect another target won’t end the process.
- Global Scene Tools will still be linked to your active Selection
- This includes Move Tool, Rotate Tool, Scale Tool… etc.
- Press the Select Button if you need them to point to your Tab’s target(s).
This setting is recommended for tasks that don't require Scene Tools (Move, Rotate, etc.) and when you don’t want to lose your current selection or active Editor Tool.
Auto-selection On
- When you switch to a different Tab, its target will be selected in the Hierarchy
- In the case of multi-target Tabs, all GameObjects will be selected at once.
- Global Scene Tools will point to the new Tab’s target(s) by default
- This includes Move Tool, Rotate Tool, Scale Tool… etc.
- Active Editor Tools may close when switching Tabs
- So if you are editing an Animation or a Collider, the process will end.
This setting is recommended when working with Scene Tools (Move, Scale, Rotate…) and when you want to be sure you're targeting the content of your active Tab.
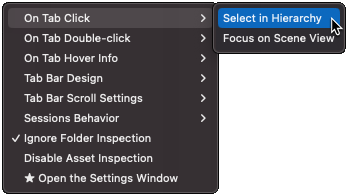
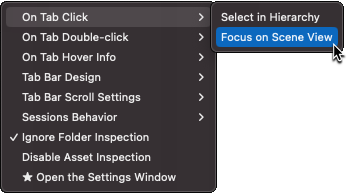
You can turn on and off Auto-selection in the Settings Window or in the Context Menu, via ‘Inspector Settings/On Tab Click/Select in Hierarchy’.
Pro Tip: You can combine Auto-selection off with Behavior on Tab Double-click -> ‘Select Tab Target(s)’ for a half way approach.
2.2.5.2 Auto-focus on Scene View (Disabled by default)
When enabled, CoInspector will automatically focus the target(s) of your Tabs when you switch Tabs, just as if you had clicked the Focus Button.
You can change this setting at any moment in the Settings Window, or in the Context Menu by selecting ‘Inspector Settings/On Tab Click/Focus on Scene View’
.
2.2.6 Behavior on Tab Double-click
CoInspector also lets you perform actions when double-clicking a Tab.
You can only have one active behavior, so choose wisely!:
- Lock/Unlock Tabs: To Lock or Unlock the Tab immediately.
- Select Tab Target(s): This will select the targets in the Hierarchy, just like clicking the Select Button. (A great option to have when Auto-selection is off!)
- Enabled by default!
- Focus Tab Target(s) on Scene View: Double-clicking a Tab will focus its target as if you had used the Focus Button (or had double-clicked the target in the Hierarchy).
- Show in Local Hierarchy View: Double-clicking a Tab will work as pressing the Local Hierarchy View button. This is not available in multi-target Tabs.
You can customize these behaviors in the Settings Window or in the Context Menu, under 'Inspector Settings/On Tab Double-click'.
2.2.7 Behavior on Tab Hover
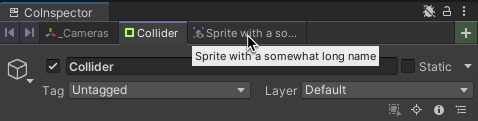
By default, hovering a Tab for a couple of seconds will provide information about its target(s).
You can decide how much information you want to see:
- Name only: This option will simply provide the full name of the hovered Tab.
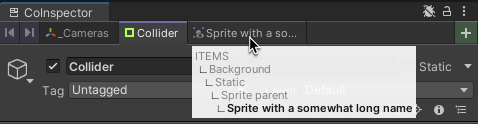
- Tree view: This will provide the relative position of the GameObject in the Hierarchy.
- Helpful to tell apart GameObjects with similar names and repeated groups.
- You can only see up to 4 parents.
- Nothing: Y-you can probably guess this one.
2.2.7.1 Hovering multi-target Tabs
Unless set to ‘Nothing’, hovering multi-target Tabs will always show the names of the GameObjects included in the selection as a list.
______
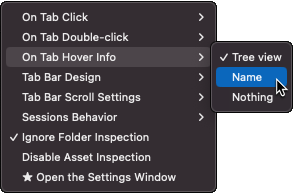
You can change the Tab Hover Behavior in the Settings Window and within ‘Inspector Settings/On Tab Hover Info’ in the Context Menu.
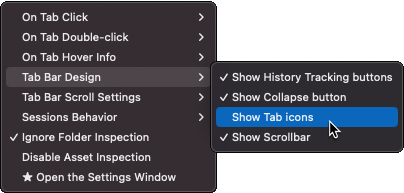
2.2.8 Tab Bar Customization
The Tab Bar can be slightly customized to remove some visual elements you may wish to hide.

At this moment, the following elements can be hidden:
- Tab Icons
- The locked bar icon will still show up!
- The History Tracking buttons
- Closed Tab Recovery and Sessions will keep working.
- The Collapse/Expand button
- The Tab Bar Scrollbar
- You can still use the mouse wheels to scroll.
- The On Tab Hover Info Text
- By setting the option to ‘Nothing’.
__________
All these options can be individually modified in the Tab design section of the Settings Window and in the Context Menu.
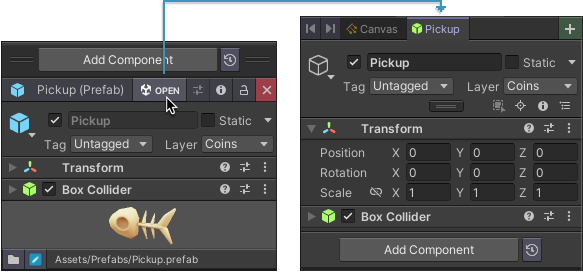
2.2.9 Tabs and Prefab Mode
When you Open a Prefab Asset in Prefab Mode*CoInspector will automatically create a dedicated Tab for it, and its name will turn blue.
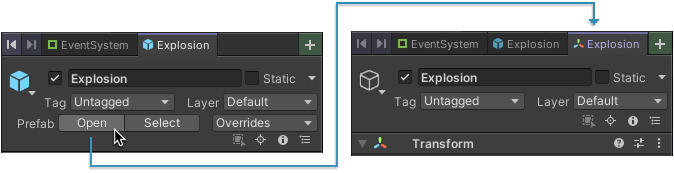
(Opening a Prefab Asset from its Prefab Instance)
*This doesn't mean inspecting Prefab Instances in the scene, but opening a Prefab Asset in Context or Isolation. This is done via the Prefab ‘Open’ Button, by double-clicking a Prefab Asset, or opening a Prefab Asset via the Asset View.
Keep in mind the following things while in Prefab Mode:
- You can fully inspect the content of the Prefab with all Tab features: This includes lock/debug modes, multi-target Tabs, History Tracking, and so on.
- Existing Tabs can be accessed and used: Tabs targeting the active scene can still be fully inspected, allowing you to check them, modify them, or drag them into the Prefab.
- Tabs created in Prefab Mode will be closed once you exit it: As the targets no longer exist once closed. Records of the Prefab found in other Tabs will also be removed.
- Existing Tabs may be closed too: If you switch to an already existing Tab and start inspecting the Prefab, it will close when exiting Prefab Mode if no valid target is found between its 10 History Steps.
- Blue names and the lack of a Prefab icon will help you identify Prefab Tabs

(Exiting Prefab Mode, CoInspector deletes all Prefab Tabs)
_____
For clarity, we recommend using new, dedicated Tabs when working in Prefab Mode.
2.3 History Tracking
As an internet browser, each Tab tracks your movements, allowing you to navigate your recent targets at any point.
A Tab can remember up to the last 10 selections (single or multiple) you've worked with.
2.3.1 Basic Controls
You have the following options:
- To move one step back or forth, click the Back and Forward buttons.
- To open the step as a new Tab, middle-click the Back and Forward buttons.

- The new Tab will inherit the original Tab's history tracking.
- To jump to a specific history step, right-click the Back and Forward buttons and choose your desired target from the list.
It’s currently not possible to open specific steps in new Tabs, as Unity’s default Context Menus don’t distinguish mouse button clicks. We’re working on a custom solution.
2.3.2 Considerations and Limitations
- When working with multi-selections, each change is considered a History Step. So, when moving back or forward, CoInspector will undo or redo the selection.
- With Auto-selection on, going back/forward will also update your active Selection.
- A locked Tab can move back and forward. This is expected behavior, so Tabs can stay locked while taking advantage of History Steps.
- Selecting a new target after moving back will remove existing forward steps. This is expected behavior based on how web browsers manage history navigation.
- Inactive GameObjects won’t survive History records after restarting the Editor due to a Unity limitation.
- When exiting Prefab Mode, CoInspector will remove all records of said Prefab from your Tabs or close them if no valid target is found. This is expected behavior to avoid leaving empty New Tabs all over the place.
2.3.3 Restoring Closed Tabs
CoInspector also includes a handy way to recover your last 10 closed Tabs.
Simply right-click a Tab (or the Tab Bar) and pick the option in the Context Menu:

Every recovered Tab will carry over its entire History!
2.4 Advanced Dragging
CoInspector expands on dragging for a seamless flow between Tabs, Components and Assets.
2.4.1 Dragging Tabs onto Fields
Tabs can be dragged for more than just reordering them:
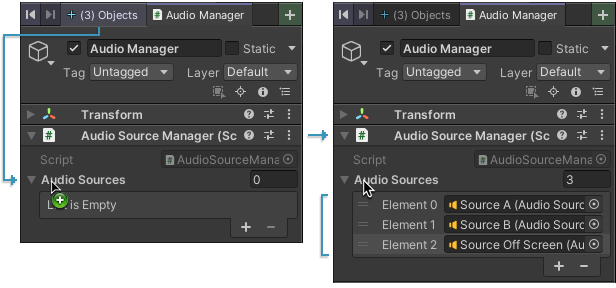
- Drag a Tab downwards to start dragging the GameObject itself, so you can drop it in any Component or Asset field without switching Tabs.
- Dragging multi-target Tabs will include all the targets within it, so you can fill in arrays with a single drop.
2.4.2 Dragging Components, GameObjects or Assets onto Tabs
Sometimes, you will need to drag a Component, GameObject or an Asset onto a field on a different Tab.
To streamline this process, you can simply:
- Drag the Component/GameObject/Asset and hover the Tab.
- The Tab will become active after a few seconds.
- You may need to move the cursor while hovering!
- Drop your object(s) or keep switching Tabs until you find the target.
Note: Dragging Tabs directly onto other Tabs isn’t supported yet!
2.4.3 Dragging and Cloning Components
As expected, you can drag Components to reorder them…

…but CoInspector takes the concept a bit further:
2.4.3.1 Cloning Components
Hold Control (or Command) while reordering a Component, and the blue visual bar will turn green. Now, instead of moving the Component, you’ll create a copy at the selected position without needing to Copy and Paste.
2.4.3.2 Moving Components between GameObjects
If you drag a Component onto a different Tab and hover its Components, the blue bar will appear. This will move the Component to that GameObject at the selected position.
This greatly streamlines the process of relocating Components between GameObjects, removing the need to Copy-Paste.
2.4.3.3 Cloning Components between GameObjects
If you hold Control (or Command) when moving Components between GameObjects, the blue bar will turn green. This will create an exact copy at the selected position.
This is a straightforward way of duplicating Components between GameObjects, removing the need of Copy and Paste, and any additional step to reorder the Component.
2.4.3.4 Some considerations!
- To make reordering easier, collapsed Components will only expand when dragging over their left side.
- Some Component Types (Renderers, Animators…) can’t be present twice in the same GameObject, so you won’t be able to clone them either.
- Prefab Assets in Asset View can’t have their Components reordered or cloned.
Please, open them in Context or Exclusive mode. - Dragging and cloning isn’t available yet for multi-target Tabs, but regular context menu options will work normally. (We’re working on it!!)
2.4.4 Dragging Assets from the Asset Bar
To drag the Asset(s) you’re currently working with on the Asset View, simply drag the Asset Bar itself. This works with both single Asset selections and multi selections.
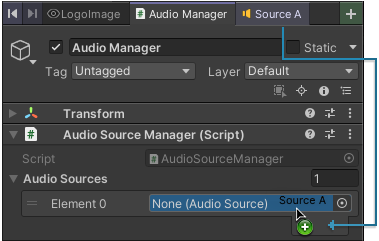
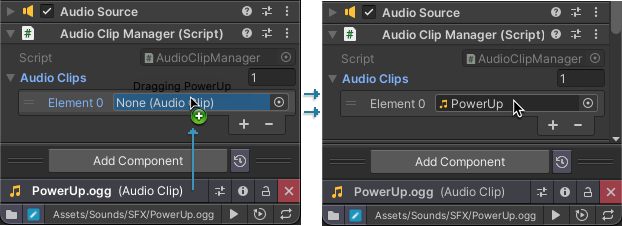
2.4.5 Dragging Assets as Components
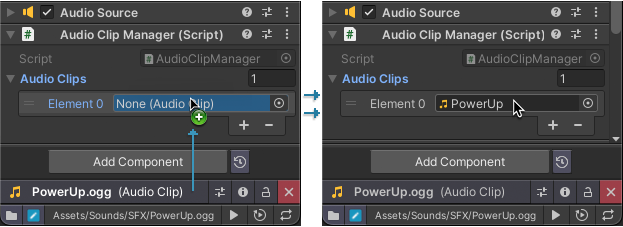
When dragging Assets of specific Types, CoInspector will try to add them as Components.
For example, dragging an AudioClip will add an AudioSource, an AnimatorController will create an Animator, a Sprite a SpriteRenderer… etc.
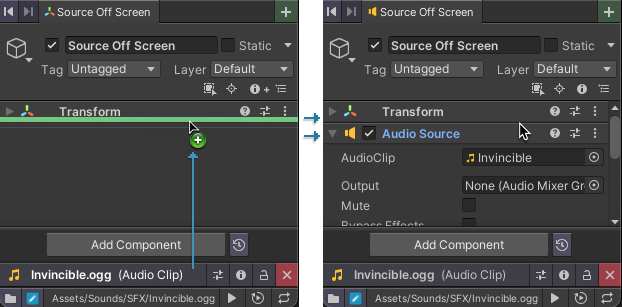
This is still a proof of concept, so the list of compatible Types is still underwhelmingly short:
AudioClip ➝ AudioSource | AnimatorController ➝ Animator | Sprite ➝ SpriteRenderer/Image* Texture2D ➝ RawImage |
(*Depending on the GameObject having a Transform or a RectTransform)
If you’d like to suggest new combinations, just let us know at hey@stuff-solutions.com!
2.5 The Tab Context Menu
When you right-click a Tab (or the Tab Bar itself), a Context Menu will show up. This menu provides specific actions for the selected Tab, and settings that can affect the GameObject View, the Asset View or CoInspector in general.
2.5.1 Tab Options
These are the actions that affect the Tab you right-clicked on and your GameObject workspace.
- Add Tab to the Right / Add New Tab: It adds a New Tab next to the selected Tab.
- Lock/Unlock Tab: Locks or unlocks the Tab.
- Select in Hierarchy: Selects in Hierarchy the target(s) of the Tab.
- This option will be disabled if already selected.
- Focus on Scene View: Focuses the Scene View on the target(s) of the Tab.
- Ping in Hierarchy: To Ping the target of the Tab in the Hierarchy.
- Show In Local Hierarchy View: It opens the target of the Tab in Local Hierarchy View.
- This option gets disabled in multi-target Tabs.
- Close Tab and Close all other Tabs: Well… you most probably can guess.
- Restore Closed Tab: It restores up to 10 closed Tabs. Learn more in the Restore Closed Tabs section.
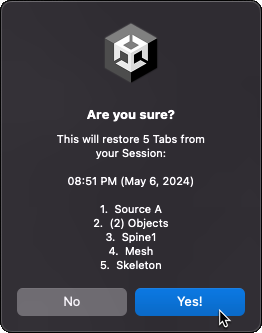
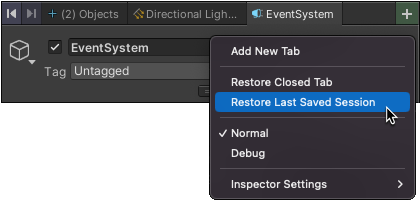
- Restore Last Saved Session: CoInspector will load the existing Session for the active scene.
- A prompt will give you more information about the date and content of it:
- Normal / Debug: To switch the Tab between its Normal and its Debug modes.
Extra Options for Prefab Instances
When a Prefab instance is the target of the clicked Tab, CoInspector will add new options:

- Open Root Prefab Asset in Scene Context:
- To Open the Prefab in Scene Context Prefab Mode
- Open Root Prefab Asset in Isolation:
- To Open the Prefab in Scene Context Prefab Mode
- Ping Root Prefab Asset:
- To Ping the actual Prefab Asset in the Project Window.
2.5.2 Inspector Settings
This section acts as a compact version of the Setting Window, allowing you to modify settings and behaviors of the GameObject View, Sessions and the Asset View.
Options included here are:
- On Tab Click: Sets the Behavior on Tab Click (what happens when you click on a Tab or switch to it).
- Select in Hierarchy: To toggle Auto-selection on Tab click.
- Focus on Scene View: To toggle Auto-focus on Tab click.
- On Tab Double-click: Sets the Behavior on Tab Double-click (what happens when you double-click a Tab).
- Lock or Unlock Tab: Toggles between lock states on Tab double-click.
- Select in Hierarchy: Selects target(s) on Tab double-click.
- Focus target on Scene View: Focuses target(s) on Tab double-click.
- Show in Local Hierarchy Pop-up: Shows targets in Local Hierarchy View on Tab double-click.
- On Tab Hover Info: Sets the Behavior on Tab Hover (the text that appears when you hover a Tab)
- Tree view: Shows the full name of the target and up to 3 parents.
- Name: Shows just the full name of the target.
- Nothing: Shows… nothing.
(Unless ‘Nothing’, multi-target Tabs will always show the names of all targets.)
- Tab Bar Design: Sets Tab Bar Customization options (which elements to show on the Tab Bar).
- Show icons: Disable to hide icons on Tabs.
- Show History Tracking buttons: Disable to hide the Back and Forward buttons.
- Show Collapse button: Disable to hide the Component Collapse/Expand button.
- Show scrollbar: Disable to hide the Tab Bar scrollbar
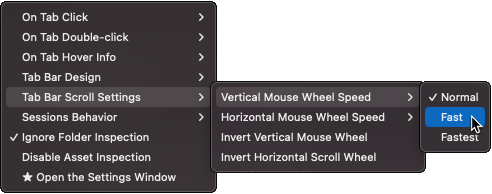
- Tab Bar Scroll Settings: Sets how scrolling the Tab Bar works when using the mouse wheels.
- Vertical Mouse Wheel Speed: Sets how fast scrolling the regular wheel affects Tab scrolling, between Normal, Fast and Fastest.
- Horizontal Mouse Wheel Speed: Sets how fast scrolling the secondary wheel affects Tab scrolling, between Normal, Fast and Fastest.
- Invert Vertical Mouse Wheel: Inverts Tab scrolling direction when using the main mouse wheel.
- Invert Horizontal Mouse Wheel: Inverts Tab scrolling direction when using the secondary mouse wheel.
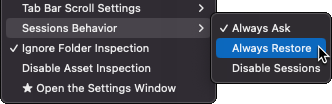
- Sessions Behavior: Sets the Sessions Settings (how CoInspector handles previous Sessions after restarting or switching scenes).
- Always Ask: CoInspector will ask to load a previous Session.
- Always Restore: CoInspector will automatically load the previous Session.
- Disable Sessions: CoInspector won’t ask to load Sessions.
- Ignore folder Inspection: When enabled, CoInspector will ignore clicking on single folders to make asset browsing more relevant.
- Disable Asset Inspection: When enabled, CoInspector’s Asset View will be disabled.
- ★Open the Settings Window: It opens the actual Settings Window.
3. The Asset View
The other main section of CoInspector is the Asset View, a full-on secondary inspector designed to handle Assets in a less intrusive, yet more flexible way.
It’s an independent panel that you can freely resize, customize, lock, minimize… or just leave it there. No matter what, it will not interfere with your Scene and Tabs.
Combined with new features and shortcuts, the goal is simply to make dealing with Assets as intuitive and straightforward as possible.
3.1 Asset Inspection
As the GameObject View does with GameObjects, the Asset View will only accept Assets as targets, ignoring empty selections. You can keep working normally with your scene and Tabs while your inspected Assets remain available at the Asset View.
- Inspected Assets will be available until you select new ones, close the Asset View, or delete the Asset(s).
- Unlike GameObjects, you can only have one active Selection (single or multi-target) active in the Asset View.
- You can lock the Asset View[link] to keep your current target fixed.
- You can set the Asset View to Debug Mode
- When no Asset is selected (or you close Asset View), the section will not be visible.
3.2 Inspection Detail on the Asset View
These are options that allow you to set how much information you want to see on your Asset View, and some extra features.
3.2.1 Compact Mode and Import Settings
By default, CoInspector presents a compressed version of your Assets, excluding most Import Settings, the default Header, and some specific fields depending on the Asset.
This is called Compact Mode, and is meant to make previewing Assets a little more straightforward, hiding all those settings we interact with only at specific times.
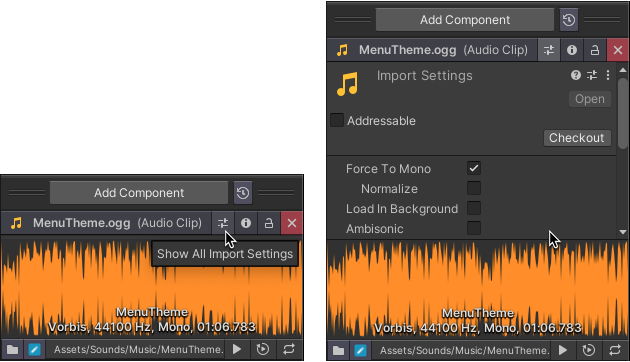
Some notes:
- You can exit Compact Mode at any point to show all the Import Settings of your Assets by just clicking the Import Settings button.
- Your choice will remain active until changed again.
3.2.2 Expanding and Collapsing the Asset View
By default, the Asset View shows Expanded. However, it can also be Collapsed into a non-intrusive footer, while still remaining completely functional.
You can easily switch between modes by clicking the Asset Bar or choosing the option in the Asset View Context Menu.
______
Some notes:
- You can show more details about your Assets by enabling the Import Settings.
- Your current mode will remain when changing your target Asset
3.3 The Add Component Bar
When an Asset is inspected, the Add Component Bar becomes a visual separator between the GameObject View and the Asset View, gaining some new features.
3.3.1 Resizing The Asset View
When the Asset View is expanded, the bar will become draggable. This allows you to freely resize the Asset View to take as little space as you want.
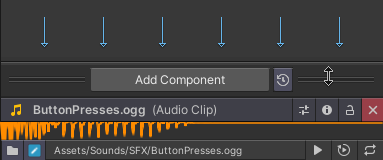
Assets with Previews (like Textures or AudioClips) can be expanded to increase Preview size:
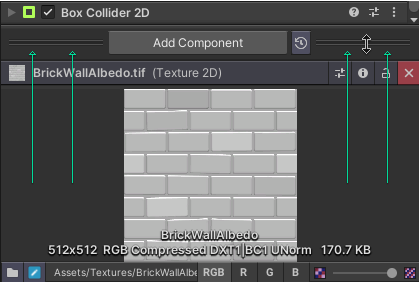
- When Collapsed, the Asset View cannot be resized. Expand it first!
- The Asset View will never take more than ⅔ of CoInspector’s height.
- Your custom size will be reset when targets change.
3.3.2 The Asset History Button
While Asset View doesn’t feature full History Tracking, it does keep track of your recent selections, allowing you to go back to them even after the Asset View has been closed.
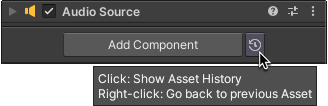
You have 2 options:
- Regular click: It will show a list with your last 10 Asset selections, so you can go back to whichever you want.

- Multi-selections can be recovered “in bulk” or just one of their elements.
- Right-click: To switch between your last 2 Asset selections, working as the “Back” button of a TV.
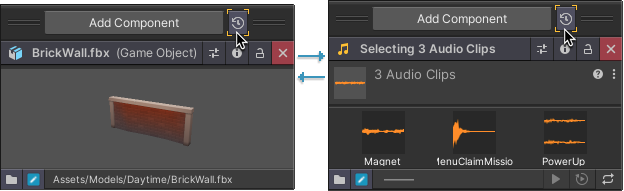
- Useful for quickly switching between 2 Assets you’re working on.
- If no Asset is selected, it will restore the last active one.
Some notes:
- Your Asset History is independent of your Sessions. They will not be overwritten by loading Sessions or changing Scenes.
- If the Asset View is locked, Asset(s) can still be recovered, and the panel will remain locked. This is intended behavior, so users can combine History Tracking with an always locked Asset View.
- If no Asset has been selected yet, the button will be disabled.
3.4 The Asset Bar
The Asset Bar is the blue bar on top of the Asset View. It provides information about your target and lets you access some features and shortcuts.
This bar will always be visible if an Asset is being inspected, Collapsed or not.
3.4.1 Basic Features
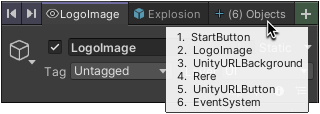
- Provide Asset Information: The icon, name, extension and type of the inspected Asset will be shown on the left side of the bar.
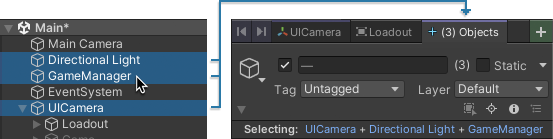
- With multi-selections, it will provide the number of selected objects.
- Expand and Collapse the Asset View: Click the bar to toggle between modes.
- Drag and Drop: Dragging the Asset Bar itself will drag all the inspected Asset(s) so you can use them on Tabs, Components fields or wherever you want.
- More on this in the Advanced Dragging section.
- Open the Asset View Context Menu: Right-clicking the Asset Bar to access features and settings.
3.4.2 Dedicated Buttons
To change the Asset View look and make small adjustments.
3.4.2.1 Default Buttons
The buttons that are always present in the bar, no matter the selected Asset.

- Show/Hide Import Settings: To reveal the complete import settings of your Asset(s) instead of showing a compact version.
- Open in Inspector: In case of compatibility issues or visual bugs, use it to send the inspected Asset(s) to the regular Inspector window.
- Holding Shift/Alt while will open the Asset in a new, locked Inspector window.
- Lock/Unlock Asset View: Locks the Asset View so that the current Asset(s) remain inspected no matter where you click.
- Close the Asset View: Stops inspecting and closes the Asset View window.
- You can also do this by middle-clicking the Asset Bar!
3.4.2.2 Context-specific Buttons:
These are the buttons that will only appear in certain circumstances.
- Exit Debug Mode: Visible only when Debug Mode is active.
- Debug Mode can be enabled via the Asset View Context Menu!

- Open Prefab: To open a selected Prefab Asset in exclusive Prefab Mode.

- The Save Button: To save and write to the disk the changes made to a dirty Asset.

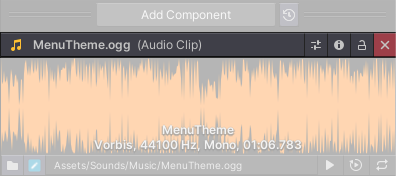
3.5 The Bottom Bar
The last part of Asset View.
This additional bar is also visible whenever an Asset is selected, and provides convenient shortcuts for accessing and editing your active Assets.
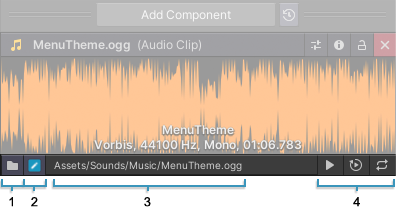
Elements:
- Folder Button: Opens the selected Assets in your system's file explorer.
- Edit Button: Opens the selected Assets with the default external application (like Photoshop for textures).
- Asset Path: Displays the path of the selected asset, but also:
- Click the path: To Ping the Asset in the Project window
- Right-click the path: To instantly copy the path of the Asset to your clipboard.
- Preview Controls: If the inspected Assets have available previews (like AudioClips), the bar will display all its relevant controls, such as Play, Stop, Loop, etc.
Note: Options like Pinging or Copying Asset Path won’t work with multiple Assets selected!
______
This set of tools and buttons allow you to directly access and interact with your selected Assets at any time without needing to resort to the Project Window.
3.6 Prefab Assets and Asset View
When clicking on a Prefab Asset, it will show up in the Asset View itself instead of in the GameObject View.
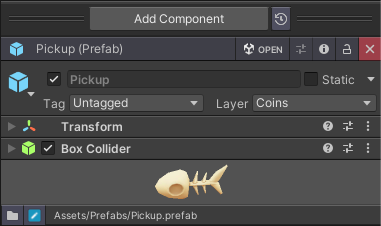
This is meant to be a fast way of checking and editing Prefab Assets, so keep in mind the following:
- By default, Components will show collapsed for a more compact view. You can change this in the Customization and Settings section.
- Advanced Dragging is not available to move and clone Components, but you can use traditional context menu options to reorder and copy Components.
- The Expand and Collapse additional Context Menu options are not available in this mode either.
If you need a more precise Prefab inspection, just use the "OPEN" button at the Asset Bar to open the Prefab Asset in a dedicated Prefab Mode Tab with all options available!
3.7 Customization and Inspection Settings
The Asset View offers various customization options to optimize your workflow:
- Ignore Single Folders (enabled by default): When enabled, CoInspector will not consider single folders to be Assets.
- Allows for an easier Asset navigation, as opening folders will not remove your active selection.
- Multiple folders and/or folders mixed with other Assets will be considered inspectable Assets.
- Disable Asset Inspection: When enabled, CoInspector will outright ignore Assets and only the GameObject View will be active.
- If you disable Asset Inspection, you can turn it back on from the Tab Context Menu and the Settings Window.
- Collapsed Prefab View (enabled by default): When enabled, Prefab Assets will show all their Components collapsed for a more compact view.
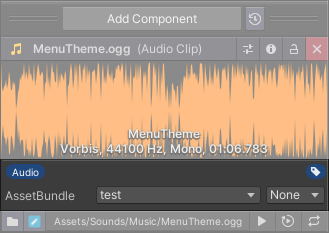
- Show Asset Bundle Footer (enabled by default): When enabled, Assets will show an additional footer, allowing you to set an Asset Bundle and an Asset Tag for your selected Assets.
All these Settings can be changed in the Settings Window and by opening the Asset View Context Menu.
3.8 The Asset View Context Menu
As with the Tabs Context Menu, right-clicking the Asset Bar will show up the Asset View’s own Context Menu. Here, you can trigger basic actions and change settings of the Asset View.
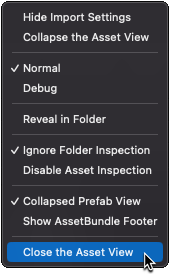
The available options are:
- Hide/Show Import Settings: To show inspected Assets in compact mode or with their full import settings.
- Collapse/Expand the Asset View: To Collapse or not the Asset View into a small bar.
- Normal/Debug Mode: To enter or exit Debug Mode in Asset View.
- Reveal in Folder: To reveal inspected Assets in the Explorer/Finder.
- Ignore Folder Inspection: To make CoInspector ignore single folders.
- Enable/Disable Asset Inspection: To disable the Asset View entirely.
- You can re-enable it later at the GameObject Context Menu or the Settings Window.
- Collapsed Prefab View: To always show Prefab Assets in collapsed mode.
- Show/Hide AssetBundle Footer: To show or hide the AssetBundle and Asset Label sections.
- Close Asset View: To stop inspecting the current Asset(s) and close Asset View.
4. Sessions
When you open CoInspector after a restart or a crash, you'll be asked to restore your previous workspace. This will also happen after switching to a scene you've previously worked on.
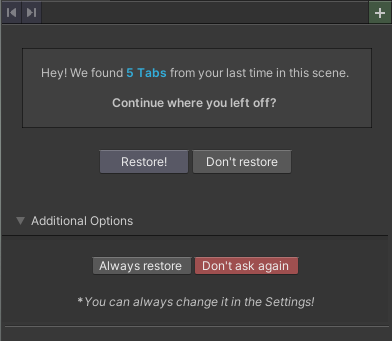
This is the result of Sessions, a built-in auto-save feature that keeps track of your workspace in every scene and allows you to keep it consistent between editor restarts and scene changes, including your Tabs, Assets, History Tracking, and even your closed Tabs!
4.1 How Sessions Work
- CoInspector periodically saves your data to prevent significant loss after crashes.
- When you close CoInspector, or switch scenes, a Session linked to said scene is created.
- When relaunching CoInspector (or switching scenes), CoInspector will look for a valid Session, and will try to restore all your Tabs, Assets, and settings.
- Additionally, you can use the Restore Last Saved Session Context Menu option to manually load the last created Session at any point!
4.2 Sessions Behavior
By default, after loading a Session or changing scenes, CoInspector will show you the Recovery Screen, listing the number of Tabs and your choices to proceed:
(Tip: You can see more info about the recovered Tabs by hovering the message!)
This will set your Sessions Behavior, or the way you prefer the system to handle the process:
- Restore!:
- CoInspector will restore this Session and keep offering to restore Sessions.
- Don’t restore:
- CoInspector won’t restore this Session, but will keep offering to restore Sessions.
- Always restore:
- CoInspector will restore this Session and all future ones without asking.
- This also affects changing scenes.
- Don’t ask again:
- CoInspector will never ask to restore Sessions, and you’ll always start with a clean workspace.
- CoInspector keeps track of your workspace for internal stability, so you can still restore your Last Saved Session at any point!
__________
You can change your Session Behavior via the Context Menu and the Settings Window.
4.3 Limitation with Inactive GameObjects
Due to a limitation in the way Unity tracks inactive GameObjects, CoInspector won’t be able to restore Inactive GameObjects after the Editor has been closed.
This means that, once the Editor has been closed, inactive GameObjects previously included in your Tabs, multi-target Tabs, or history will be omitted when restoring a Session.
We’re actively working on finding a universal solution to this limitation.
5. The Settings Window
CoInspector provides a comprehensive Settings Window, which can be found in the Window section of your Unity menu.
5.1 General Settings
These are the settings that control the broad behavior of CoInspector and Sessions.
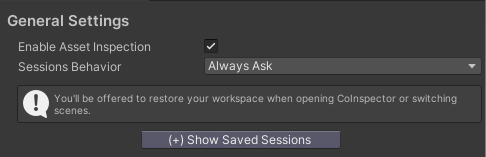
- Enable Asset Inspection: This option enables or disables the Asset View. If disabled, CoInspector will outright ignore any asset clicked on or selected.
- Sessions Behavior: This dropdown menu lets you choose how CoInspector handles Sessions. The options are:
- Always Ask (Default): CoInspector will ask if you want to restore your previous Session after the Editor starts, or if you change scenes.
- Always Restore: CoInspector will always restore your previous Session.
- Disable Sessions: CoInspector will never ask to restore Sessions and will start with a clean workspace.
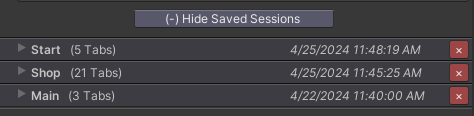
- Show/Hide Saved Sessions: Use this option to check and manage your existing Sessions for all your scenes. Here you can:
- Check the date and the Scene of any existing Session
- Show the names of all Tabs stored in each Session
- Delete a Session
5.2 Tab Settings
Settings that affect Tabs, their behaviors and their appearance.
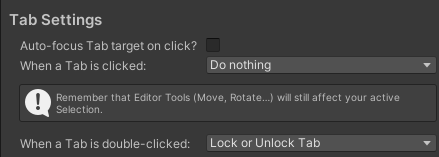
- Auto-focus Tab target on click?: This determines the Auto-focus feature. If enabled, Tab target(s) will be automatically focused on Scene View.
- When a Tab is clicked: This setting determines the Auto-selection behavior when clicking Tabs. You can choose between:
- Select in Hierarchy: Clicking on a Tab will select its target(s) in the Hierarchy window.
- Do nothing: Clicking on a Tab will perform no additional action.
- When a Tab is double-clicked: This setting defines the Behavior on Tab Double-click. You can choose between:
- Lock or Unlock Tab: Double-clicking a Tab will lock or unlock it.
- Select targets in Hierarchy: Double-clicking a Tab will select its target(s) in the Hierarchy window.
- Focus targets on Scene View: Double-clicking a Tab will focus the Scene View on its target(s).
- Show in Local Hierarchy Pop-up: Double-clicking a Tab will pop up the Local Hierarchy of its target.
5.2.1 Tab design
Customizes the Appearance of your Tab Bar.
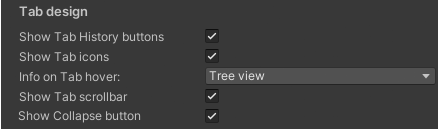
- Show Tab History buttons: Shows or hides the History navigation buttons.
- Show Tab icons: Enables or disables showing icons on Tabs (excluding when locked).
- Info on Tab hover: Determines the Behavior On Tab Hover. You can choose between:
- Name: Will show the full name of the target GameObject.
- Tree view: Will show up to 3 parents of the target GameObject.
- Nothing: Will show nothing.
- Show Tab scrollbar: Shows or hides the Tab Bar scrollbar.
- Show Collapse button: Shows or hides the Collapse/Expand button for Components.
5.2.1 Mouse wheel scroll
Settings that control how you scroll Tabs with your mouse wheels.

- Vertical wheel speed: Adjusts scroll speed when using the main mouse wheel. Choose between:
- Normal
- Fast
- Fastest
- Horizontal wheel speed: Adjusts the scrolling speed when using the secondary mouse wheel (if available). Choose between:
- Normal
- Fast
- Fastest
- Invert vertical scroll: Inverts the scroll direction of your Tabs when using the main mouse wheel.
- Invert horizontal scroll: Inverts the scroll direction of your Tabs when using the secondary mouse wheel (if available).
5.3 Asset Settings
Settings that affect the Asset View. Only available when Asset Inspection is enabled.
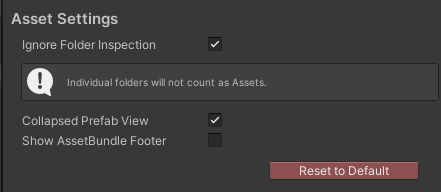
- Ignore Folder Inspection: If enabled, individual folders will not be considered Assets and will be ignored by the Asset View, making Asset browsing a bit less frustrating.
- Collapsed Prefab View: When enabled, prefabs in the Asset View will have all their Components collapsed by default for a more compact view. This also affects prefab-derived objects, like imported objects.
- Show AssetBundle Footer: Shows or hides the AssetBundle and Asset Label footers in the Asset View.
5.4 Reset to Default
Clicking this button will reset all the settings in this window to its default values, but keeping all your existing Sessions intact.
____
These settings should allow you to tailor CoInspector to your needs and preferences. Feel free to explore and adjust them until you find a workflow you’re comfortable with.
We like to offer as many options as possible, so if you miss any setting or would like to have more control over some specific feature, please let us know at hey@stuff-solution.com.
6. Plans and Future Features
6.1 Some stuff we want to add soonish:
- Drag GameObjects to create new Tabs
- Advanced Dragging and Cloning for Multi-selections and Prefabs
- More control over the Local Hierarchy View (rename, delete, multi-select…)
- Inactive GameObject compatibility in saved sessions
- Keyboard shortcuts for navigating History
- More Assets compatible with Dragging as Components
- A fix for that annoying bug you found
6.2 Some stuff who knows when we’ll be able to add:
- Tab system for the Asset View.
- Multiple Window support
- Drag Tabs to create new Windows
- Smart Selection (Like no auto-selection, but automatically selecting the active target/s when the user is about to use a Scene Tool like Move, Rotate, etc.).
0. An Introduction
0.1 CoInspector
CoInspector has been designed to (mostly!) behave and feel like the regular Inspector, so using it should be as intuitive and easy as possible. For this same reason, most if not all of your custom inspectors, extensions and editor plugins should be compatible out-of-the-box.
CoInspector also adds a great amount of features and shortcuts over the regular Inspector, so this Manual will try to introduce and explain all your cool new tools.
0.2 Compatibility and Performance
CoInspector is designed to be compatible with all your custom editors and Inspector customizations. However, it's impossible to guarantee compatibility with plugins that rely on ‘brute-force’ approaches like injection to customize the Inspector Window or specific Editors.
These plugins work by finding the Inspector Window, breaking its visual elements apart, and then inserting extra stuff between them, as bars or buttons. While this is not "incompatible" with CoInspector, this process can be incredibly taxing if not implemented cautiously, and may cause undesired behaviors, including:
- Performance overhead: As these plugins need to constantly look for, gather and modify the active Inspector Window. Thus, even if you close the Inspector, they will keep looking for it in the background, adding unnecessary overhead.
- Compromising CoInspector’s visual cohesion: By injecting extra elements in places we cannot foresee. This can range from funny visual stuff to making the Editor unusable.
- Errors: Most common when a plugin assumes it’ll find a regular Inspector Window or tries to inject elements at fixed positions without proper checks.
For the best experience, we strongly recommend disabling injection-based customizations of the Inspector to avoid potential issues.
If there is a specific feature you miss, let us know at hey@stuff-solutions.com, and we will consider incorporating it directly into CoInspector.
0.3 Shortcuts and Tips
This section provides a compact list of the most useful shortcuts and features that CoInspector introduces (because we get that reading the whole thing may not be your best plan).
If you want to learn more about any of these tips, refer to the linked sections of the manual!
0.3.1 Tabs/GameObjects
- Middle-click GameObjects in the Hierarchy to open them as a New Tab.
- You can drag and drop your Tabs as GameObjects into Inspector fields.
- Hold Ctrl/Cmd when reordering Components to clone them.
- You can Drag Components between different Tabs/GameObjects.
- Set Behaviors when you Click a Tab to automatically select its target and/or focus them on the Scene View.
- Set a Behavior when you Double-click a Tab for actions like locking, selecting, or focusing it.
- Set a Behavior when you Hover a Tab to see information about your targets.
- Components have additional Context Menu options like Move to Top, Collapse All, or Expand All But This.
- You can Right Click individual elements of a multi-selection to open them in New Tabs or remove them from the selection.
- Use the Local Hierarchy View to instantly check and access a target's parents, children, and siblings.
- Right-click the Back or Forward History buttons to see all steps and jump to them.
- Middle-click the Back or Forward History buttons to open the previous or next step in a new Tab.
- Right-click a Tab (or the Tab Bar) and choose Restore Closed Tab to recover up to 10 recently closed Tabs.
- You can Customize your Tab Bar to hide icons, buttons, or the scrollbar.
0.3.2 Assets
- By default, CoInspector ignores Folders so they don’t take over your selection when navigating the Project Window. You can disable this in the Settings Window.
- Click the Asset Bar once to Expand or Collapse the Asset View.
- Drag the Asset Bar itself to quickly drag and drop the inspected Asset(s) into fields or Components.
- You can directly drag certain Assets (like AudioClips, Animators, or Sprites) between Components to add them as new components.
- Drag the Add Component Bar to resize your Asset View and the Asset Preview size.
- Right-click the Asset History Button to switch between your last two inspected Assets or recover the last closed one.
- Click the Asset path in the Bottom Bar to ping the Asset, or right-click it to copy its path to your clipboard.
- Use the Folder Button and Edit Button in the Bottom Bar to reveal Assets in your file explorer, or open them with the default external application.
- You can hide or show the AssetBundle and Asset Tag footer.
0.3.3 General Stuff
- Use the Inspector Buttons in the Asset View and the GameObject View to send your targets to the regular Inspector.
- Hold Alt/Shift to pop them up in an exclusive window.
- Even with Sessions disabled, you can recover your last active workspace by choosing Recover Last Saved Session in the Tab Context Menu.
- CoInspector saves your last workspaces in each Scene you work on. You can change how to recover them (always, ask, or never) in Sessions Behavior.
- Access a compact version of the Settings Window by right-clicking a Tab, opening the Tab Context Menu and choosing Inspector Settings.
______
These shortcuts and tips should help you grasp the essential features and workflows of CoInspector, making their experience with the tool more efficient.
1. Split Inspection
CoInspector’s main feature, and the reason it came to be, is the Split Inspection, or the ability to inspect GameObjects and Assets at the same time in different sections of the window.
Unlike other “custom inspector” solutions that either modify the original Inspector or clone its contents, CoInspector is 100% independent of the Inspector Window. This allows CoInspector to sort and inspect targets independently of your active selection.
This way, CoInspector splits itself into 2 sections: The GameObject View and the Asset View. Each independent of the other, yet designed to work together. Assets will never override your GameObjects and GameObjects will never override your Assets.
Combined with its Tabs and History Tracking, CoInspector introduces a new set of options that allow you to work on multiple GameObjects and Assets at the same time, removing any need to juggle between multiple Inspector windows and lock states.
One window, unlimited targets.
2. The GameObject View
The GameObject section remains visually close to the regular Inspector, but introduces a great number of improvements and tools.
These new features include a Tabs system, History Tracking, Advanced Dragging, and some new Buttons and Tools covered in this section.
2.1 New Buttons and Tools
These are features that can be accessed through buttons or are integrated within CoInspector itself. Some buttons may mention Tabs, but they will be fully explained in their own section.
2.1.1 The Select Button
This button instantly selects the target of the active Tab in the Hierarchy. With multi-target Tabs, every target will be selected at once.
To know if the active Tab is already selected, use the following visual cues:
- A blue line will appear above the Tab.
- The Select button will show as disabled.
Modes:
- Regular click: It will select in the Hierarchy the target or targets of the active Tab.
- Right click: To select the targets and also focus them on Scene View. If you just want to focus the target, use the Focus Button.
(With both ‘Auto-selection’ and ‘Auto-focus’ enabled, you will rarely interact with this button.)
2.1.2 The Focus Button
This button is meant to help you center your workspace around your active Tab and targets without needing to double-click the Hierarchy or change your active Selection.
Modes:
- Regular click: To focus the target of your Tab on Scene View. In other words, it centers your view as if you had double-clicked the GameObject in the Hierarchy.
With multi-target Tabs, the view will be centered on a point between all targets. - Right click: To ping the target in the Hierarchy. For multi-target tabs, only the first element will be pinged.
- Middle click: To auto-scroll the Tab Bar to your active Tab. Useful when you have many Tabs open at the same time.
(Example of a Tab after being scrolled back into view)
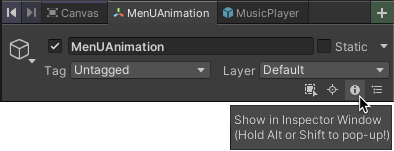
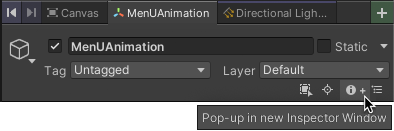
2.1.3 The Inspector Button
This button is exclusively dedicated to sending the active target(s) of your Tab to the regular Inspector Window.
Modes:
- Regular click: It will send the target(s) of the Tab to the regular Inspector Window. If an Inspector Window is already available, it will use it. If not, it will create a new one.
- Alt/Shift + click: It will pop up the target(s) of the Tab in an exclusive, locked Inspector Window.
Why is this here?
- Currently, CoInspector doesn’t support multiple windows, and some users may prefer combining Tabs with multiple locked Inspectors for certain tasks.
- CoInspector draws every component as the regular Inspector, but it’s impossible to assume perfect compatibility. If something fails with a Component or a plugin, this button will help you keep working.
- Certain Editor Tools could not trigger outside the Inspector Window. This is not CoInspector’s fault, but a Unity limitation present in Property Windows.
We've implemented workarounds to manually trigger these tools and have tested extensively to find all possible cases, but some may have escaped our best efforts.
If a component, extension or custom editor fails to show or presents any bug or error, please let us know at hey@stuff-solutions.com.
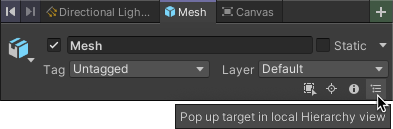
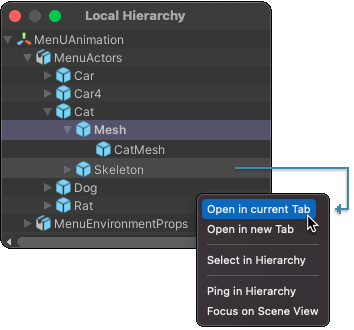
2.1.4 Local Hierarchy View
This button gives you access to another new feature: the Local Hierarchy View.
This allows you to instantly check your target’s position in the Hierarchy without pinging it.
When clicked, CoInspector will pop up the target in a custom, independent Hierarchy Window, where you can easily check and access its parents, children or siblings.
Things you can do here:
- Instantly check and access the target’s parents, children and siblings.
- Set a new target for the Tab: Click any GameObject or choose the option in the Context Menu.
- Open a GameObject in a new Tab: Middle-click any GameObject or choose the option in the Context Menu.
- Select/Ping/Focus a GameObject: Right-click it to open the Context Menu and choose the desired option.
This button is disabled with multi-target Tabs, but thanks to the new Multi-selection View, you can right-click any individual GameObject of your selection to open its Local Hierarchy View.
2.1.5 Improved Multi-selection View
When adding CoInspector’s multi-target support, we quickly found a limitation in our design:
“Wait, so how does the user know which GameObjects they’re targeting…?”
- An underpaid Unity dev
…And then, we remembered this already happens in the regular Inspector, so we decided to add a little tweak:
A foldable section that lists the content of every multi-selection.
This way, you can be sure of the GameObjects you're working on.
Some extra things you can do here:
- Inspect individual elements: Just click it on the list
- Open elements in a new Tab: Just middle-click it.
- Remove elements from the selection: Just right-click and choose the option
- Ping and Focus elements: Just right-click and choose the option.
- Open elements in Local Hierarchy View: Just right-click and choose the option
Combined with Tabs and History Tracking, this should make your experience of dealing with multi-selections way more streamlined and intuitive.
2.1.6 Improved Component Control
CoInspector introduces new ways to quickly expand/collapse your Components and reorder them: These are the Component Collapse/Expand Button and some New Component Context Menu Options.
2.1.6.1 The Component Collapse/Expand Button
This button helps you quickly collapse or expand all components in the inspector window.
Modes:
- Regular click: To collapse all components at once.
- If all components are already collapsed, the button will turn blue, and clicking it will instead expand the components back.
- Right click: To expand all components at once.
You can show or hide this button through the Settings Window or in the Context Menu, at ‘Inspector Settings/Tab Bar Design/Show Collapse button’.
2.1.6.2 New Component Context Menu Options
CoInspector adds individual options to your Components so you can have even more control over them:
Things you can do here:
- Move to Top: To instantly send a Component to the top of the Component list.
- Collapse All: To collapse all Components at once.
- Collapse All But This: To collapse all Components, keeping the selected one expanded.
- Expand All: To expand all Components at once.
- Expand All But This: To expand all Components, keeping the selected one collapsed.
Note: When using "… All But This" options, CoInspector will scroll to the selected Component to help you identify it.
_______
These tools, combined with Advanced Dragging, provide quick and flexible ways to control and rearrange your components within the inspector window.
2.2 Tabs
Tabs are the second main feature of CoInspector. As tabs on a browser, you can create as many as you want, rearrange them, and switch between unlimited targets with a single click.
Each Tab works as an independent Inspector. Unless locked, the active Tab will update as the Selection changes, but ignoring null selections, empty selections and, of course, Assets.
Some of their main features include:
- They cannot be null: Empty or invalid selections will be ignored. Only choosing a new target, deleting the current one or closing the Tab will affect your active target.
- They’re 100% independent between them: So you can assign different lock states, debug modes and combine different multi selections.
- They keep track of your Inspection History: So you can freely navigate each Tab’s last selections and even recover them if accidentally closed.
2.2.1 Types of Tabs
Depending on the number of GameObjects inspected, a Tab will be a Regular Tab or a multi-target Tab. Understanding them will help you make the most of your workspace.
2.2.1.1 Regular Tabs
These are the ones that point to a single GameObject in the Hierarchy.
Visually, these Tabs will display the name of the target and an icon representing its most relevant component (or you can disable icons in the Customization Section).
2.2.1.2 Multi-target Tabs
When more than a GameObject is selected, the active Tab becomes a multi-target Tab. Visually, they will display a blue ‘+’ symbol and the number of objects selected.
Each Tab works as an isolated multi-selection, so you can:
- Store different selections in different Tabs and switch between them.
- Use the Improved Multi-selection View, to check your targets, open them in new Tabs, remove them from the selection… and more.
Combined with Individual lock states and History Tracking, it is highly unlikely to lose a multi-selection, even by accident.
Multi-target Tabs work as Regular Tabs do, but they have some considerations to keep in mind:
- Components can’t be reordered via dragging: But you can still use the Component’s Context Menu options to move them down and up.
- Local Hierarchy View is not available: But you can right-click individual elements to individually open them in this mode.
- Focus on Scene View can be unreliable: As it will try to find a “middle point” between all targets.
- Deleting GameObjects will remove them from any Tab targeting them.
2.2.2 Creating Tabs
When creating Tabs, you can choose between completely New Tabs or already Filled Tabs.
2.2.2.1 New Tabs
These are Tabs with no target assigned yet. To assign a target, just click on any GameObject in the Hierarchy and the Tab will update to register it, as the regular Inspector Window would.
You have the following ways to create them:
- Click the Add Button: To add a New Tab to the end of the Bar.
- Right/middle-click the Add Button: To add a New Tab right next to your active Tab.
- Right-click a Tab and select “Add Tab to the Right”: The New Tab will be added right next to it.
Some considerations:
- New Tabs can’t be locked or set to Debug Mode.
- Untouched New Tabs (as in, created but never assigned a target) are ignored by History Tracking and Sessions, so they will be automatically erased after Assembly Reloads, Editor restarts and Play Mode changes.
2.2.2.2 Filled Tabs
These are Tabs created with target(s) already assigned, so you can immediately start working on them.
You have 2 options:
- Middle-click a GameObject on the Hierarchy: This will open it as a Tab next to the current one (just as if you had middle-clicked a suspicious link on your browser!).
- Right-click a GameObject and choose ‘Open Selection in a New Tab’: This will open it in a Tab at the end of the Tab Bar, without setting it active.
______
To open multiple GameObjects as a multi-target Tab, the process is as follows:
- Have an active multi selection in the Hierarchy.
- Middle-click any GameObject of the selection (or choose the ‘Open in a New Tab’ option). The Tab will be created right next to your active Tab.
Finally, you can duplicate any existing Tab by right-clicking it and accessing the Context Menu.
2.2.3 Basic Controls
For an easy workflow, CoInspector Tabs are designed to mimic browser tabs.
Some things that you can do:
- Drag them around to rearrange them.
- Dragging Tabs has more uses, like dragging them into Inspector fields as GameObjects. This is explained in the Advanced Dragging section.
- Close them with a middle-click.
- Hover them to reveal information about their target(s).
- Click them to perform a Behavior on Tab Click
- An automatic action each time you click on a Tab
- Double-click them to perform a Behavior on Tab Double-Click
- An automatic action triggered each time you double-click a Tab
- Right-click them to reveal a Tab Context Menu with way more options.
Pretty straightforward!
2.2.3.1 Scrolling the Tab Bar
For navigating the Tab Bar once it starts to get filled, you can either use the Scrollbar that will show up, or simply scroll around using any of your mouse wheels.
The Scrollbar visibility, the scroll speeds and scroll directions of both mouse wheels can be modified in the Settings Window, and within Inspector Settings, in the Context Menu.
2.2.4 Lock State and Debug Mode
Each Tab has its unique Lock State and Debug Mode. Locking a Tab will keep its target(s) fixed until you unlock it again, and the Debug Mode will show or hide the debug inspector.
To change them, you have the following options:
- The upper right buttons: These will affect the active Tab, and as such, they also serve as visual indicators of the current state of the tab.
Example of a locked Tab. Example of a Tab in Debug Mode
- The Context Menu: Right-click any Tab to change its Lock/Debug modes without switching tabs.
- The Locked Tab Icon: The icon that appears when a Tab is locked can be clicked to unlock the Tab. This icon will appear even if you disable icons in Tab Customizations.
- Setting your Behavior On Tab Double-Click to Lock/Unlock: This will make double-clicking Tabs immediately switch between locked and locked.
Keep in mind that Debug Modes and Lock States cannot be applied to New Tabs.
2.2.5 Behaviors on Tab Click
CoInspector provides some automatic actions when switching Tabs: Auto-selection and Auto-Focus on Scene View.
2.2.5.1 Auto-selection (Disabled by default)
When enabled, switching Tabs will also select the target(s) of it in the Hierarchy, just as if you had clicked the Select Button.
Setting Auto-selection to on or off has different use cases. We recommend reading about both and combining them based on your tasks and preferred workflow.
Auto-selection Off
- Switching Tabs won’t affect your active Selection
- Active Editor Tools will keep working after switching Tabs
- So if you’re editing an Animation or a Collider, switching to inspect another target won’t end the process.
- Global Scene Tools will still be linked to your active Selection
- This includes Move Tool, Rotate Tool, Scale Tool… etc.
- Press the Select Button if you need them to point to your Tab’s target(s).
This setting is recommended for tasks that don't require Scene Tools (Move, Rotate, etc.) and when you don’t want to lose your current selection or active Editor Tool.
Auto-selection On
- When you switch to a different Tab, its target will be selected in the Hierarchy
- In the case of multi-target Tabs, all GameObjects will be selected at once.
- Global Scene Tools will point to the new Tab’s target(s) by default
- This includes Move Tool, Rotate Tool, Scale Tool… etc.
- Active Editor Tools may close when switching Tabs
- So if you are editing an Animation or a Collider, the process will end.
This setting is recommended when working with Scene Tools (Move, Scale, Rotate…) and when you want to be sure you're targeting the content of your active Tab.
You can turn on and off Auto-selection in the Settings Window or in the Context Menu, via ‘Inspector Settings/On Tab Click/Select in Hierarchy’.
Pro Tip: You can combine Auto-selection off with Behavior on Tab Double-click -> ‘Select Tab Target(s)’ for a half way approach.
2.2.5.2 Auto-focus on Scene View (Disabled by default)
When enabled, CoInspector will automatically focus the target(s) of your Tabs when you switch Tabs, just as if you had clicked the Focus Button.
You can change this setting at any moment in the Settings Window, or in the Context Menu by selecting ‘Inspector Settings/On Tab Click/Focus on Scene View’
.
2.2.6 Behavior on Tab Double-click
CoInspector also lets you perform actions when double-clicking a Tab.
You can only have one active behavior, so choose wisely!:
- Lock/Unlock Tabs: To Lock or Unlock the Tab immediately.
- Select Tab Target(s): This will select the targets in the Hierarchy, just like clicking the Select Button. (A great option to have when Auto-selection is off!)
- Enabled by default!
- Focus Tab Target(s) on Scene View: Double-clicking a Tab will focus its target as if you had used the Focus Button (or had double-clicked the target in the Hierarchy).
- Show in Local Hierarchy View: Double-clicking a Tab will work as pressing the Local Hierarchy View button. This is not available in multi-target Tabs.
You can customize these behaviors in the Settings Window or in the Context Menu, under 'Inspector Settings/On Tab Double-click'.
2.2.7 Behavior on Tab Hover
By default, hovering a Tab for a couple of seconds will provide information about its target(s).
You can decide how much information you want to see:
- Name only: This option will simply provide the full name of the hovered Tab.
- Tree view: This will provide the relative position of the GameObject in the Hierarchy.
- Helpful to tell apart GameObjects with similar names and repeated groups.
- You can only see up to 4 parents.
- Nothing: Y-you can probably guess this one.
2.2.7.1 Hovering multi-target Tabs
Unless set to ‘Nothing’, hovering multi-target Tabs will always show the names of the GameObjects included in the selection as a list.
______
You can change the Tab Hover Behavior in the Settings Window and within ‘Inspector Settings/On Tab Hover Info’ in the Context Menu.
2.2.8 Tab Bar Customization
The Tab Bar can be slightly customized to remove some visual elements you may wish to hide.
At this moment, the following elements can be hidden:
- Tab Icons
- The locked bar icon will still show up!
- The History Tracking buttons
- Closed Tab Recovery and Sessions will keep working.
- The Collapse/Expand button
- The Tab Bar Scrollbar
- You can still use the mouse wheels to scroll.
- The On Tab Hover Info Text
- By setting the option to ‘Nothing’.
__________
All these options can be individually modified in the Tab design section of the Settings Window and in the Context Menu.
2.2.9 Tabs and Prefab Mode
When you Open a Prefab Asset in Prefab Mode*CoInspector will automatically create a dedicated Tab for it, and its name will turn blue.
(Opening a Prefab Asset from its Prefab Instance)
*This doesn't mean inspecting Prefab Instances in the scene, but opening a Prefab Asset in Context or Isolation. This is done via the Prefab ‘Open’ Button, by double-clicking a Prefab Asset, or opening a Prefab Asset via the Asset View.
Keep in mind the following things while in Prefab Mode:
- You can fully inspect the content of the Prefab with all Tab features: This includes lock/debug modes, multi-target Tabs, History Tracking, and so on.
- Existing Tabs can be accessed and used: Tabs targeting the active scene can still be fully inspected, allowing you to check them, modify them, or drag them into the Prefab.
- Tabs created in Prefab Mode will be closed once you exit it: As the targets no longer exist once closed. Records of the Prefab found in other Tabs will also be removed.
- Existing Tabs may be closed too: If you switch to an already existing Tab and start inspecting the Prefab, it will close when exiting Prefab Mode if no valid target is found between its 10 History Steps.
- Blue names and the lack of a Prefab icon will help you identify Prefab Tabs
(Exiting Prefab Mode, CoInspector deletes all Prefab Tabs)
_____
For clarity, we recommend using new, dedicated Tabs when working in Prefab Mode.
2.3 History Tracking
As an internet browser, each Tab tracks your movements, allowing you to navigate your recent targets at any point.
A Tab can remember up to the last 10 selections (single or multiple) you've worked with.
2.3.1 Basic Controls
You have the following options:
- To move one step back or forth, click the Back and Forward buttons.
- To open the step as a new Tab, middle-click the Back and Forward buttons.
- The new Tab will inherit the original Tab's history tracking.
- To jump to a specific history step, right-click the Back and Forward buttons and choose your desired target from the list.
It’s currently not possible to open specific steps in new Tabs, as Unity’s default Context Menus don’t distinguish mouse button clicks. We’re working on a custom solution.
2.3.2 Considerations and Limitations
- When working with multi-selections, each change is considered a History Step. So, when moving back or forward, CoInspector will undo or redo the selection.
- With Auto-selection on, going back/forward will also update your active Selection.
- A locked Tab can move back and forward. This is expected behavior, so Tabs can stay locked while taking advantage of History Steps.
- Selecting a new target after moving back will remove existing forward steps. This is expected behavior based on how web browsers manage history navigation.
- Inactive GameObjects won’t survive History records after restarting the Editor due to a Unity limitation.
- When exiting Prefab Mode, CoInspector will remove all records of said Prefab from your Tabs or close them if no valid target is found. This is expected behavior to avoid leaving empty New Tabs all over the place.
2.3.3 Restoring Closed Tabs
CoInspector also includes a handy way to recover your last 10 closed Tabs.
Simply right-click a Tab (or the Tab Bar) and pick the option in the Context Menu:
Every recovered Tab will carry over its entire History!
2.4 Advanced Dragging
CoInspector expands on dragging for a seamless flow between Tabs, Components and Assets.
2.4.1 Dragging Tabs onto Fields
Tabs can be dragged for more than just reordering them:
- Drag a Tab downwards to start dragging the GameObject itself, so you can drop it in any Component or Asset field without switching Tabs.
- Dragging multi-target Tabs will include all the targets within it, so you can fill in arrays with a single drop.
2.4.2 Dragging Components, GameObjects or Assets onto Tabs
Sometimes, you will need to drag a Component, GameObject or an Asset onto a field on a different Tab.
To streamline this process, you can simply:
- Drag the Component/GameObject/Asset and hover the Tab.
- The Tab will become active after a few seconds.
- You may need to move the cursor while hovering!
- Drop your object(s) or keep switching Tabs until you find the target.
Note: Dragging Tabs directly onto other Tabs isn’t supported yet!
2.4.3 Dragging and Cloning Components
As expected, you can drag Components to reorder them…
…but CoInspector takes the concept a bit further:
2.4.3.1 Cloning Components
Hold Control (or Command) while reordering a Component, and the blue visual bar will turn green. Now, instead of moving the Component, you’ll create a copy at the selected position without needing to Copy and Paste.
2.4.3.2 Moving Components between GameObjects
If you drag a Component onto a different Tab and hover its Components, the blue bar will appear. This will move the Component to that GameObject at the selected position.
This greatly streamlines the process of relocating Components between GameObjects, removing the need to Copy-Paste.
2.4.3.3 Cloning Components between GameObjects
If you hold Control (or Command) when moving Components between GameObjects, the blue bar will turn green. This will create an exact copy at the selected position.
This is a straightforward way of duplicating Components between GameObjects, removing the need of Copy and Paste, and any additional step to reorder the Component.
2.4.3.4 Some considerations!
- To make reordering easier, collapsed Components will only expand when dragging over their left side.
- Some Component Types (Renderers, Animators…) can’t be present twice in the same GameObject, so you won’t be able to clone them either.
- Prefab Assets in Asset View can’t have their Components reordered or cloned.
Please, open them in Context or Exclusive mode. - Dragging and cloning isn’t available yet for multi-target Tabs, but regular context menu options will work normally. (We’re working on it!!)
2.4.4 Dragging Assets from the Asset Bar
To drag the Asset(s) you’re currently working with on the Asset View, simply drag the Asset Bar itself. This works with both single Asset selections and multi selections.
2.4.5 Dragging Assets as Components
When dragging Assets of specific Types, CoInspector will try to add them as Components.
For example, dragging an AudioClip will add an AudioSource, an AnimatorController will create an Animator, a Sprite a SpriteRenderer… etc.
This is still a proof of concept, so the list of compatible Types is still underwhelmingly short:
|
AudioClip ➝ AudioSource |
AnimatorController ➝ Animator |
Sprite ➝ SpriteRenderer/Image* Texture2D ➝ RawImage |
(*Depending on the GameObject having a Transform or a RectTransform)
If you’d like to suggest new combinations, just let us know at hey@stuff-solutions.com!
2.5 The Tab Context Menu
When you right-click a Tab (or the Tab Bar itself), a Context Menu will show up. This menu provides specific actions for the selected Tab, and settings that can affect the GameObject View, the Asset View or CoInspector in general.
If you don’t click on a Tab, you’ll see an abridged version without Tab-specific actions.
If you click on a Tab, you’ll see the full Context Menu
2.5.1 Tab Options
These are the actions that affect the Tab you right-clicked on and your GameObject workspace.
- Add Tab to the Right / Add New Tab: It adds a New Tab next to the selected Tab.
- Lock/Unlock Tab: Locks or unlocks the Tab.
- Select in Hierarchy: Selects in Hierarchy the target(s) of the Tab.
- This option will be disabled if already selected.
- Focus on Scene View: Focuses the Scene View on the target(s) of the Tab.
- Ping in Hierarchy: To Ping the target of the Tab in the Hierarchy.
- Show In Local Hierarchy View: It opens the target of the Tab in Local Hierarchy View.
- This option gets disabled in multi-target Tabs.
- Close Tab and Close all other Tabs: Well… you most probably can guess.
- Restore Closed Tab: It restores up to 10 closed Tabs. Learn more in the Restore Closed Tabs section.
- Restore Last Saved Session: CoInspector will load the existing Session for the active scene.
- A prompt will give you more information about the date and content of it:
- Normal / Debug: To switch the Tab between its Normal and its Debug modes.
Extra Options for Prefab Instances
When a Prefab instance is the target of the clicked Tab, CoInspector will add new options:
- Open Root Prefab Asset in Scene Context:
- To Open the Prefab in Scene Context Prefab Mode
- Open Root Prefab Asset in Isolation:
- To Open the Prefab in Scene Context Prefab Mode
- Ping Root Prefab Asset:
- To Ping the actual Prefab Asset in the Project Window.
2.5.2 Inspector Settings
This section acts as a compact version of the Setting Window, allowing you to modify settings and behaviors of the GameObject View, Sessions and the Asset View.
Options included here are:
- On Tab Click: Sets the Behavior on Tab Click (what happens when you click on a Tab or switch to it).
- Select in Hierarchy: To toggle Auto-selection on Tab click.
- Focus on Scene View: To toggle Auto-focus on Tab click.
- On Tab Double-click: Sets the Behavior on Tab Double-click (what happens when you double-click a Tab).
- Lock or Unlock Tab: Toggles between lock states on Tab double-click.
- Select in Hierarchy: Selects target(s) on Tab double-click.
- Focus target on Scene View: Focuses target(s) on Tab double-click.
- Show in Local Hierarchy Pop-up: Shows targets in Local Hierarchy View on Tab double-click.
- On Tab Hover Info: Sets the Behavior on Tab Hover (the text that appears when you hover a Tab)
- Tree view: Shows the full name of the target and up to 3 parents.
- Name: Shows just the full name of the target.
- Nothing: Shows… nothing.
(Unless ‘Nothing’, multi-target Tabs will always show the names of all targets.)
- Tab Bar Design: Sets Tab Bar Customization options (which elements to show on the Tab Bar).
- Show icons: Disable to hide icons on Tabs.
- Show History Tracking buttons: Disable to hide the Back and Forward buttons.
- Show Collapse button: Disable to hide the Component Collapse/Expand button.
- Show scrollbar: Disable to hide the Tab Bar scrollbar
- Tab Bar Scroll Settings: Sets how scrolling the Tab Bar works when using the mouse wheels.
- Vertical Mouse Wheel Speed: Sets how fast scrolling the regular wheel affects Tab scrolling, between Normal, Fast and Fastest.
- Horizontal Mouse Wheel Speed: Sets how fast scrolling the secondary wheel affects Tab scrolling, between Normal, Fast and Fastest.
- Invert Vertical Mouse Wheel: Inverts Tab scrolling direction when using the main mouse wheel.
- Invert Horizontal Mouse Wheel: Inverts Tab scrolling direction when using the secondary mouse wheel.
- Sessions Behavior: Sets the Sessions Settings (how CoInspector handles previous Sessions after restarting or switching scenes).
- Always Ask: CoInspector will ask to load a previous Session.
- Always Restore: CoInspector will automatically load the previous Session.
- Disable Sessions: CoInspector won’t ask to load Sessions.
- Ignore folder Inspection: When enabled, CoInspector will ignore clicking on single folders to make asset browsing more relevant.
- Disable Asset Inspection: When enabled, CoInspector’s Asset View will be disabled.
- ★Open the Settings Window: It opens the actual Settings Window.
3. The Asset View
The other main section of CoInspector is the Asset View, a full-on secondary inspector designed to handle Assets in a less intrusive, yet more flexible way.
It’s an independent panel that you can freely resize, customize, lock, minimize… or just leave it there. No matter what, it will not interfere with your Scene and Tabs.
Combined with new features and shortcuts, the goal is simply to make dealing with Assets as intuitive and straightforward as possible.
3.1 Asset Inspection
As the GameObject View does with GameObjects, the Asset View will only accept Assets as targets, ignoring empty selections. You can keep working normally with your scene and Tabs while your inspected Assets remain available at the Asset View.
- Inspected Assets will be available until you select new ones, close the Asset View, or delete the Asset(s).
- Unlike GameObjects, you can only have one active Selection (single or multi-target) active in the Asset View.
- You can lock the Asset View[link] to keep your current target fixed.
- You can set the Asset View to Debug Mode
- When no Asset is selected (or you close Asset View), the section will not be visible.
3.2 Inspection Detail on the Asset View
These are options that allow you to set how much information you want to see on your Asset View, and some extra features.
3.2.1 Compact Mode and Import Settings
By default, CoInspector presents a compressed version of your Assets, excluding most Import Settings, the default Header, and some specific fields depending on the Asset.
This is called Compact Mode, and is meant to make previewing Assets a little more straightforward, hiding all those settings we interact with only at specific times.
Some notes:
- You can exit Compact Mode at any point to show all the Import Settings of your Assets by just clicking the Import Settings button.
- Your choice will remain active until changed again.
3.2.2 Expanding and Collapsing the Asset View
By default, the Asset View shows Expanded. However, it can also be Collapsed into a non-intrusive footer, while still remaining completely functional.
You can easily switch between modes by clicking the Asset Bar or choosing the option in the Asset View Context Menu.
______
Some notes:
- You can show more details about your Assets by enabling the Import Settings.
- Your current mode will remain when changing your target Asset
3.3 The Add Component Bar
When an Asset is inspected, the Add Component Bar becomes a visual separator between the GameObject View and the Asset View, gaining some new features.
3.3.1 Resizing The Asset View
When the Asset View is expanded, the bar will become draggable. This allows you to freely resize the Asset View to take as little space as you want.
Assets with Previews (like Textures or AudioClips) can be expanded to increase Preview size:
- When Collapsed, the Asset View cannot be resized. Expand it first!
- The Asset View will never take more than ⅔ of CoInspector’s height.
- Your custom size will be reset when targets change.
3.3.2 The Asset History Button
While Asset View doesn’t feature full History Tracking, it does keep track of your recent selections, allowing you to go back to them even after the Asset View has been closed.
You have 2 options:
- Regular click: It will show a list with your last 10 Asset selections, so you can go back to whichever you want.
- Multi-selections can be recovered “in bulk” or just one of their elements.
- Right-click: To switch between your last 2 Asset selections, working as the “Back” button of a TV.
- Useful for quickly switching between 2 Assets you’re working on.
- If no Asset is selected, it will restore the last active one.
Some notes:
- Your Asset History is independent of your Sessions. They will not be overwritten by loading Sessions or changing Scenes.
- If the Asset View is locked, Asset(s) can still be recovered, and the panel will remain locked. This is intended behavior, so users can combine History Tracking with an always locked Asset View.
- If no Asset has been selected yet, the button will be disabled.
3.4 The Asset Bar
The Asset Bar is the blue bar on top of the Asset View. It provides information about your target and lets you access some features and shortcuts.
This bar will always be visible if an Asset is being inspected, Collapsed or not.
3.4.1 Basic Features
- Provide Asset Information: The icon, name, extension and type of the inspected Asset will be shown on the left side of the bar.
- With multi-selections, it will provide the number of selected objects.
- Expand and Collapse the Asset View: Click the bar to toggle between modes.
- Drag and Drop: Dragging the Asset Bar itself will drag all the inspected Asset(s) so you can use them on Tabs, Components fields or wherever you want.
- More on this in the Advanced Dragging section.
- Open the Asset View Context Menu: Right-clicking the Asset Bar to access features and settings.
3.4.2 Dedicated Buttons
To change the Asset View look and make small adjustments.
3.4.2.1 Default Buttons
The buttons that are always present in the bar, no matter the selected Asset.
- Show/Hide Import Settings: To reveal the complete import settings of your Asset(s) instead of showing a compact version.
- Open in Inspector: In case of compatibility issues or visual bugs, use it to send the inspected Asset(s) to the regular Inspector window.
- Holding Shift/Alt while will open the Asset in a new, locked Inspector window.
- Lock/Unlock Asset View: Locks the Asset View so that the current Asset(s) remain inspected no matter where you click.
- Close the Asset View: Stops inspecting and closes the Asset View window.
- You can also do this by middle-clicking the Asset Bar!
3.4.2.2 Context-specific Buttons:
These are the buttons that will only appear in certain circumstances.
- Exit Debug Mode: Visible only when Debug Mode is active.
- Debug Mode can be enabled via the Asset View Context Menu!
- Open Prefab: To open a selected Prefab Asset in exclusive Prefab Mode.
- The Save Button: To save and write to the disk the changes made to a dirty Asset.
3.5 The Bottom Bar
The last part of Asset View.
This additional bar is also visible whenever an Asset is selected, and provides convenient shortcuts for accessing and editing your active Assets.
Elements:
- Folder Button: Opens the selected Assets in your system's file explorer.
- Edit Button: Opens the selected Assets with the default external application (like Photoshop for textures).
- Asset Path: Displays the path of the selected asset, but also:
- Click the path: To Ping the Asset in the Project window
- Right-click the path: To instantly copy the path of the Asset to your clipboard.
- Preview Controls: If the inspected Assets have available previews (like AudioClips), the bar will display all its relevant controls, such as Play, Stop, Loop, etc.
Note: Options like Pinging or Copying Asset Path won’t work with multiple Assets selected!
______
This set of tools and buttons allow you to directly access and interact with your selected Assets at any time without needing to resort to the Project Window.
3.6 Prefab Assets and Asset View
When clicking on a Prefab Asset, it will show up in the Asset View itself instead of in the GameObject View.
This is meant to be a fast way of checking and editing Prefab Assets, so keep in mind the following:
- By default, Components will show collapsed for a more compact view. You can change this in the Customization and Settings section.
- Advanced Dragging is not available to move and clone Components, but you can use traditional context menu options to reorder and copy Components.
- The Expand and Collapse additional Context Menu options are not available in this mode either.
If you need a more precise Prefab inspection, just use the "OPEN" button at the Asset Bar to open the Prefab Asset in a dedicated Prefab Mode Tab with all options available!
3.7 Customization and Inspection Settings
The Asset View offers various customization options to optimize your workflow:
- Ignore Single Folders (enabled by default): When enabled, CoInspector will not consider single folders to be Assets.
- Allows for an easier Asset navigation, as opening folders will not remove your active selection.
- Multiple folders and/or folders mixed with other Assets will be considered inspectable Assets.
- Disable Asset Inspection: When enabled, CoInspector will outright ignore Assets and only the GameObject View will be active.
- If you disable Asset Inspection, you can turn it back on from the Tab Context Menu and the Settings Window.
- Collapsed Prefab View (enabled by default): When enabled, Prefab Assets will show all their Components collapsed for a more compact view.
- Show Asset Bundle Footer (enabled by default): When enabled, Assets will show an additional footer, allowing you to set an Asset Bundle and an Asset Tag for your selected Assets.
All these Settings can be changed in the Settings Window and by opening the Asset View Context Menu.
3.8 The Asset View Context Menu
As with the Tabs Context Menu, right-clicking the Asset Bar will show up the Asset View’s own Context Menu. Here, you can trigger basic actions and change settings of the Asset View.
The available options are:
- Hide/Show Import Settings: To show inspected Assets in compact mode or with their full import settings.
- Collapse/Expand the Asset View: To Collapse or not the Asset View into a small bar.
- Normal/Debug Mode: To enter or exit Debug Mode in Asset View.
- Reveal in Folder: To reveal inspected Assets in the Explorer/Finder.
- Ignore Folder Inspection: To make CoInspector ignore single folders.
- Enable/Disable Asset Inspection: To disable the Asset View entirely.
- You can re-enable it later at the GameObject Context Menu or the Settings Window.
- Collapsed Prefab View: To always show Prefab Assets in collapsed mode.
- Show/Hide AssetBundle Footer: To show or hide the AssetBundle and Asset Label sections.
- Close Asset View: To stop inspecting the current Asset(s) and close Asset View.
4. Sessions
When you open CoInspector after a restart or a crash, you'll be asked to restore your previous workspace. This will also happen after switching to a scene you've previously worked on.
This is the result of Sessions, a built-in auto-save feature that keeps track of your workspace in every scene and allows you to keep it consistent between editor restarts and scene changes, including your Tabs, Assets, History Tracking, and even your closed Tabs!
4.1 How Sessions Work
- CoInspector periodically saves your data to prevent significant loss after crashes.
- When you close CoInspector, or switch scenes, a Session linked to said scene is created.
- When relaunching CoInspector (or switching scenes), CoInspector will look for a valid Session, and will try to restore all your Tabs, Assets, and settings.
- Additionally, you can use the Restore Last Saved Session Context Menu option to manually load the last created Session at any point!
4.2 Sessions Behavior
By default, after loading a Session or changing scenes, CoInspector will show you the Recovery Screen, listing the number of Tabs and your choices to proceed:
(Tip: You can see more info about the recovered Tabs by hovering the message!)
This will set your Sessions Behavior, or the way you prefer the system to handle the process:
- Restore!:
- CoInspector will restore this Session and keep offering to restore Sessions.
- Don’t restore:
- CoInspector won’t restore this Session, but will keep offering to restore Sessions.
- Always restore:
- CoInspector will restore this Session and all future ones without asking.
- This also affects changing scenes.
- Don’t ask again:
- CoInspector will never ask to restore Sessions, and you’ll always start with a clean workspace.
- CoInspector keeps track of your workspace for internal stability, so you can still restore your Last Saved Session at any point!
__________
You can change your Session Behavior via the Context Menu and the Settings Window.
4.3 Limitation with Inactive GameObjects
Due to a limitation in the way Unity tracks inactive GameObjects, CoInspector won’t be able to restore Inactive GameObjects after the Editor has been closed.
This means that, once the Editor has been closed, inactive GameObjects previously included in your Tabs, multi-target Tabs, or history will be omitted when restoring a Session.
We’re actively working on finding a universal solution to this limitation.
5. The Settings Window
CoInspector provides a comprehensive Settings Window, which can be found in the Window section of your Unity menu.
5.1 General Settings
These are the settings that control the broad behavior of CoInspector and Sessions.
- Enable Asset Inspection: This option enables or disables the Asset View. If disabled, CoInspector will outright ignore any asset clicked on or selected.
- Sessions Behavior: This dropdown menu lets you choose how CoInspector handles Sessions. The options are:
- Always Ask (Default): CoInspector will ask if you want to restore your previous Session after the Editor starts, or if you change scenes.
- Always Restore: CoInspector will always restore your previous Session.
- Disable Sessions: CoInspector will never ask to restore Sessions and will start with a clean workspace.
- Show/Hide Saved Sessions: Use this option to check and manage your existing Sessions for all your scenes. Here you can:
- Check the date and the Scene of any existing Session
- Show the names of all Tabs stored in each Session
- Delete a Session
5.2 Tab Settings
Settings that affect Tabs, their behaviors and their appearance.
- Auto-focus Tab target on click?: This determines the Auto-focus feature. If enabled, Tab target(s) will be automatically focused on Scene View.
- When a Tab is clicked: This setting determines the Auto-selection behavior when clicking Tabs. You can choose between:
- Select in Hierarchy: Clicking on a Tab will select its target(s) in the Hierarchy window.
- Do nothing: Clicking on a Tab will perform no additional action.
- When a Tab is double-clicked: This setting defines the Behavior on Tab Double-click. You can choose between:
- Lock or Unlock Tab: Double-clicking a Tab will lock or unlock it.
- Select targets in Hierarchy: Double-clicking a Tab will select its target(s) in the Hierarchy window.
- Focus targets on Scene View: Double-clicking a Tab will focus the Scene View on its target(s).
- Show in Local Hierarchy Pop-up: Double-clicking a Tab will pop up the Local Hierarchy of its target.
5.2.1 Tab design
Customizes the Appearance of your Tab Bar.
- Show Tab History buttons: Shows or hides the History navigation buttons.
- Show Tab icons: Enables or disables showing icons on Tabs (excluding when locked).
- Info on Tab hover: Determines the Behavior On Tab Hover. You can choose between:
- Name: Will show the full name of the target GameObject.
- Tree view: Will show up to 3 parents of the target GameObject.
- Nothing: Will show nothing.
- Show Tab scrollbar: Shows or hides the Tab Bar scrollbar.
- Show Collapse button: Shows or hides the Collapse/Expand button for Components.
5.2.1 Mouse wheel scroll
Settings that control how you scroll Tabs with your mouse wheels.
- Vertical wheel speed: Adjusts scroll speed when using the main mouse wheel. Choose between:
- Normal
- Fast
- Fastest
- Horizontal wheel speed: Adjusts the scrolling speed when using the secondary mouse wheel (if available). Choose between:
- Normal
- Fast
- Fastest
- Invert vertical scroll: Inverts the scroll direction of your Tabs when using the main mouse wheel.
- Invert horizontal scroll: Inverts the scroll direction of your Tabs when using the secondary mouse wheel (if available).
5.3 Asset Settings
Settings that affect the Asset View. Only available when Asset Inspection is enabled.
- Ignore Folder Inspection: If enabled, individual folders will not be considered Assets and will be ignored by the Asset View, making Asset browsing a bit less frustrating.
- Collapsed Prefab View: When enabled, prefabs in the Asset View will have all their Components collapsed by default for a more compact view. This also affects prefab-derived objects, like imported objects.
- Show AssetBundle Footer: Shows or hides the AssetBundle and Asset Label footers in the Asset View.
5.4 Reset to Default
Clicking this button will reset all the settings in this window to its default values, but keeping all your existing Sessions intact.
____
These settings should allow you to tailor CoInspector to your needs and preferences. Feel free to explore and adjust them until you find a workflow you’re comfortable with.
We like to offer as many options as possible, so if you miss any setting or would like to have more control over some specific feature, please let us know at hey@stuff-solution.com.
6. Plans and Future Features
6.1 Some stuff we want to add soonish:
- Drag GameObjects to create new Tabs
- Advanced Dragging and Cloning for Multi-selections and Prefabs
- More control over the Local Hierarchy View (rename, delete, multi-select…)
- Inactive GameObject compatibility in saved sessions
- Keyboard shortcuts for navigating History
- More Assets compatible with Dragging as Components
- A fix for that annoying bug you found
6.2 Some stuff who knows when we’ll be able to add:
- Tab system for the Asset View.
- Multiple Window support
- Drag Tabs to create new Windows
- Smart Selection (Like no auto-selection, but automatically selecting the active target/s when the user is about to use a Scene Tool like Move, Rotate, etc.).